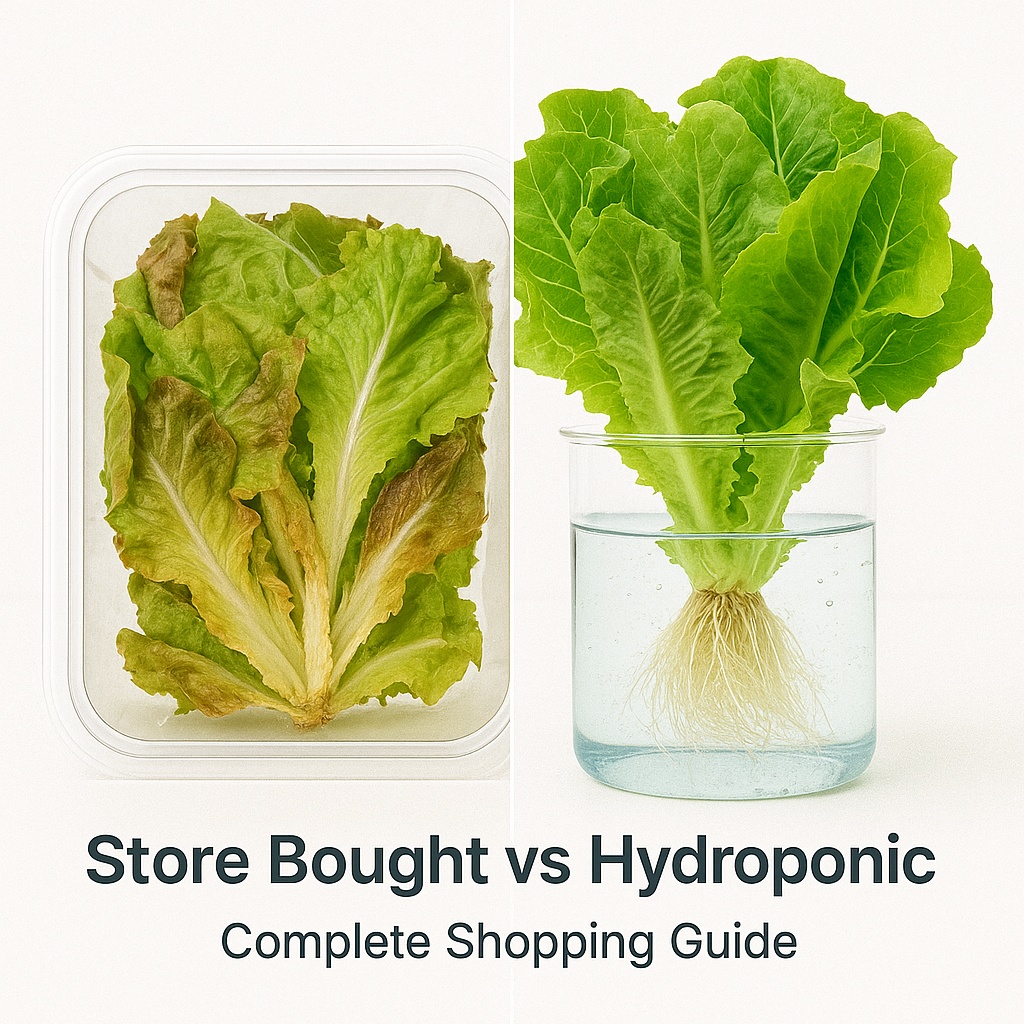
If you’re looking for the perfect plant to start your hydroponic journey, lettuce is hands down the best choice. Fast-growing, forgiving, and incredibly rewarding, hydroponic lettuce can go from seed to salad in just 4-6 weeks – and it tastes better than anything you’ll find in the grocery store.
Whether you’re a complete beginner who’s never grown anything before, or an experienced gardener looking to try soilless cultivation, this comprehensive guide will walk you through every step of growing perfect lettuce hydroponically. We’ll cover everything from seed selection to harvest, troubleshooting common problems, and maximizing your yields.
By the end of this guide, you’ll have all the knowledge and confidence needed to grow crisp, fresh lettuce year-round in your own hydroponic system.
Why Lettuce is Perfect for Hydroponic Beginners
The Ideal Starter Crop
Lettuce has earned its reputation as the “gateway plant” of hydroponics for several excellent reasons:
Fast Results: Unlike tomatoes or peppers that take months to produce, lettuce can be harvested in 4-6 weeks from seed. This quick turnaround means you’ll see results fast and stay motivated.
Forgiving Nature: Lettuce tolerates small mistakes in pH, nutrients, or care better than most crops. If you accidentally let the pH drift a bit or forget to top off the water for a day, lettuce will usually bounce back.
Shallow Root System: Lettuce doesn’t need deep containers or complex support systems. A simple 4-6 inch deep system works perfectly.
Cool Weather Preference: Lettuce actually prefers cooler conditions (60-70°F), making it ideal for indoor growing where you won’t need expensive heating systems.
High Success Rate: Studies show that beginner hydroponic growers have a 90%+ success rate with lettuce, compared to 60-70% with fruiting crops like tomatoes.
Economic Benefits
Grocery Store Comparison: A head of organic lettuce costs $3-5 at the store but costs less than $0.50 to grow hydroponically when you factor in seeds, nutrients, and electricity.
Continuous Harvest: Unlike buying lettuce that goes bad in a week, hydroponic lettuce can be harvested leaf-by-leaf as needed, staying fresh for months.
Year-Round Production: While outdoor lettuce has limited growing seasons, hydroponic lettuce can be grown 365 days a year.
Understanding Lettuce Varieties for Hydroponics
Best Lettuce Types for Hydroponic Growing
Butterhead Lettuce (Boston, Bibb):
- Growth time: 45-60 days
- Characteristics: Soft, buttery leaves with loose heads
- Hydroponic advantage: Excellent texture, doesn’t bolt easily
- Best for: Gourmet salads, beginner growers
Leaf Lettuce (Oak Leaf, Red Sails, Black Seeded Simpson):
- Growth time: 30-45 days
- Characteristics: Loose leaves, no head formation
- Hydroponic advantage: Fastest growing, continuous harvest
- Best for: Quick results, cut-and-come-again harvesting
Romaine Lettuce (Cos):
- Growth time: 50-70 days
- Characteristics: Upright growth, crisp texture
- Hydroponic advantage: Heat tolerant, good shelf life
- Best for: Caesar salads, longer-term growing
Crisphead Lettuce (Iceberg):
- Growth time: 70-90 days
- Characteristics: Dense, round heads
- Hydroponic advantage: Long storage life
- Best for: Advanced growers, commercial production
Recommended Beginner Varieties
Top 3 for First-Time Growers:
- Black Seeded Simpson (Leaf Lettuce)
- Extremely fast: ready in 30 days
- Very forgiving of mistakes
- Continuous harvest possible
- Heat tolerant
- Buttercrunch (Butterhead)
- Perfect balance of ease and quality
- Beautiful appearance
- 45-day harvest
- Excellent flavor
- Red Sails (Leaf Lettuce)
- Gorgeous red coloring
- Fast growing (35 days)
- Heat resistant
- Eye-catching in salads
Seed Quality and Sourcing
What to Look For:
- High germination rate (85%+ is ideal)
- Recent harvest date (within 2 years)
- Organic or untreated seeds when possible
- Pelleted seeds for easier handling
Reliable Seed Sources:
- Johnny’s Seeds: Professional quality, excellent variety
- Burpee: Widely available, good for beginners
- Southern Exposure: Heirloom varieties, heat-tolerant options
- Local garden centers: Fresh stock, regional varieties
Seed Storage: Store unused seeds in a cool, dry place. Properly stored lettuce seeds remain viable for 3-4 years.
Essential Equipment for Hydroponic Lettuce
Basic System Requirements
Container and Reservoir:
- Minimum 2-gallon capacity for 4-6 plants
- 5-10 gallons ideal for 8-12 plants
- Must be opaque or covered to prevent algae
- Food-grade plastic or purpose-built hydroponic containers
Growing Medium:
- Expanded clay pebbles (easiest for beginners)
- Perlite/vermiculite mix (budget option)
- Rockwool cubes (professional choice)
- Coconut coir (organic option)
Net Pots:
- 2-3 inch diameter for lettuce
- Plastic net pots are standard
- 24-pack costs $8-12
- Reusable for multiple crops
Water and Nutrient Management
pH Testing:
- Digital pH meter: $25-50 (recommended)
- pH test drops: $5-10 (backup option)
- Target range: 5.5-6.5 for lettuce
EC/TDS Testing:
- Digital EC meter: $15-35
- Target range: 1.2-1.6 EC for mature lettuce
- 0.8-1.2 EC for seedlings
Nutrients:
- Liquid nutrients: General Hydroponics Flora Series ($25-35)
- Powder nutrients: Masterblend formula ($15-25)
- pH adjusters: pH Up and pH Down ($8-12 each)
Aeration and Circulation
Air Pump System:
- 5-watt air pump for 5-gallon system
- Air stones: 2-inch cylinder stones work well
- Airline tubing: 1/4 inch aquarium grade
- Check valve to prevent back-flow
Water Circulation (if using):
- Small submersible pump (50-100 GPH)
- Timer for intermittent operation
- Not required for DWC systems
Lighting for Indoor Growing
LED Grow Lights:
- 30-50 watts actual power per 2×2 feet
- Full spectrum or 3000K-5000K white light
- 12-16 inches above lettuce
- 12-14 hours daily photoperiod
Fluorescent Options:
- T5 or T8 fluorescent fixtures
- 6500K daylight bulbs
- 6-12 inches above plants
- More affordable but less efficient than LED
Natural Light:
- South-facing window with 6+ hours direct sun
- Supplemental LED for winter months
- East or west windows with 8+ hours light
Step-by-Step Growing Process
Phase 1: Seed Starting (Days 1-14)
Germination Method 1: Paper Towel Technique
- Prepare seeds: Select 20-30 seeds (more than needed for backup)
- Dampen paper towel: Use distilled water or pH 6.0 water
- Place seeds: Distribute evenly on half the paper towel
- Fold and seal: Fold towel over seeds, place in plastic bag
- Maintain warmth: Keep at 65-75°F in dark location
- Check daily: Seeds should sprout in 2-5 days
- Transplant: Move sprouted seeds to growing medium when radicle is 1/4 inch
Germination Method 2: Direct Seeding in Medium
- Prepare net pots: Fill with dampened growing medium
- Plant seeds: 2-3 seeds per pot, 1/4 inch deep
- Initial watering: Use plain water, pH 6.0
- Cover lightly: Maintain humidity with plastic dome
- Provide light: Begin light schedule once sprouted
- Thin seedlings: Remove weaker seedlings, keep strongest
Phase 2: Seedling Stage (Days 14-21)
System Setup:
- Fill reservoir: Use plain water initially
- Adjust pH: Bring to 6.0 using pH adjusters
- Start aeration: Begin continuous air pump operation
- Position lights: 12-16 inches above seedlings
- Set timer: 14 hours light, 10 hours dark
First Nutrient Feeding:
- Week 1: 25% strength nutrient solution (0.6-0.8 EC)
- Week 2: 50% strength nutrient solution (0.8-1.0 EC)
- Week 3: 75% strength nutrient solution (1.0-1.2 EC)
Daily Care:
- Check water level and add plain water as needed
- Monitor pH daily, adjust if outside 5.5-6.5 range
- Observe seedling development
- Ensure adequate light and air circulation
Phase 3: Vegetative Growth (Days 21-35)
Nutrient Management:
- Full strength nutrients: 1.2-1.6 EC
- Weekly water changes: Replace entire nutrient solution
- Daily monitoring: Check pH and water levels
- Top-off water: Add plain water between changes
Environmental Control:
- Temperature: 60-70°F ideal (lettuce prefers cool)
- Humidity: 50-70% relative humidity
- Air circulation: Gentle fan to prevent stagnation
- Light schedule: Continue 14 hours daily
Plant Training:
- No pruning needed: Let lettuce grow naturally
- Spacing: Ensure adequate space between plants
- Support: Generally not needed for lettuce
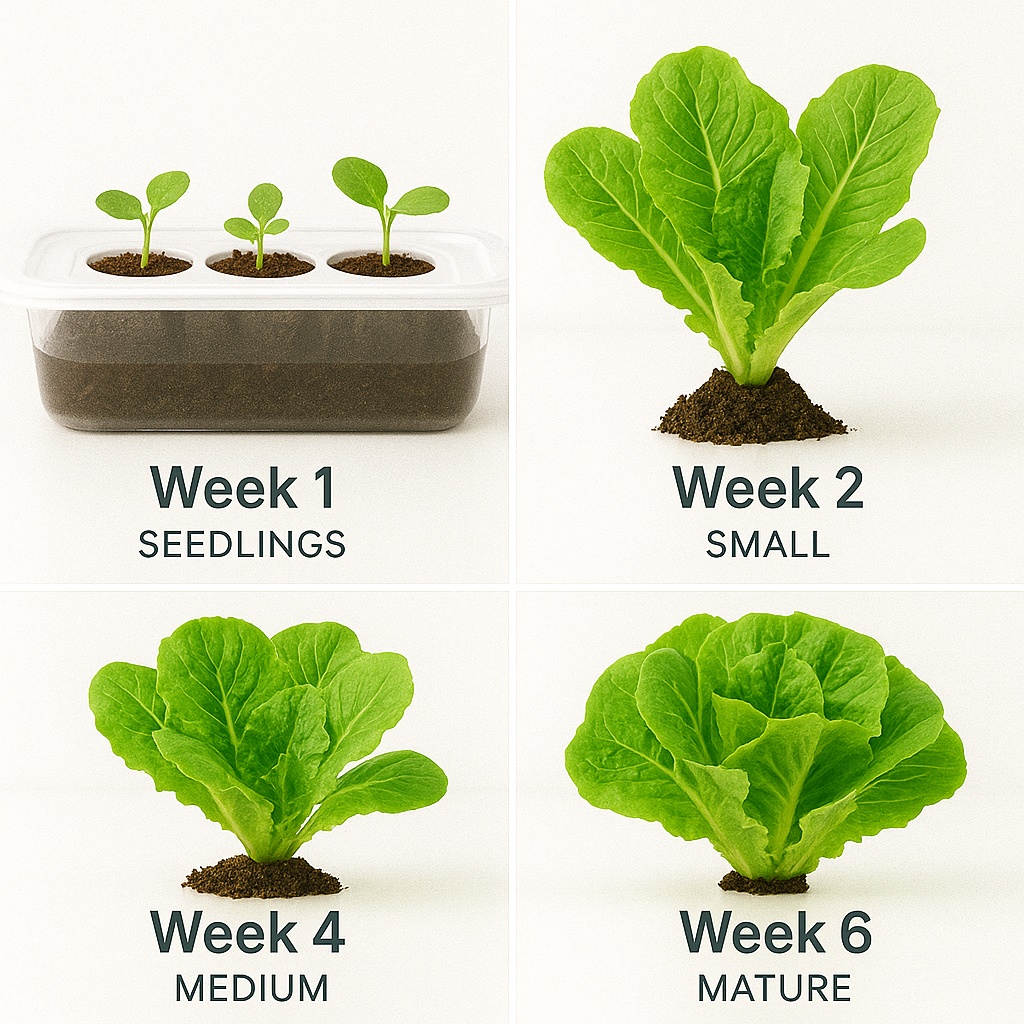
Phase 4: Maturation and Harvest (Days 35-45)
Pre-Harvest Indicators:
- Size: Leaves 4-6 inches long for leaf lettuce
- Color: Vibrant green (or red for colored varieties)
- Texture: Crisp, full leaves
- Head formation: Loose heads for butterhead varieties
Harvest Techniques:
Method 1: Whole Plant Harvest
- Cut at base: Use clean scissors or knife
- Cut above roots: Leave 1 inch of stem
- Immediate use: Best quality within hours
- Storage: Refrigerate in plastic bag with paper towel
Method 2: Cut-and-Come-Again
- Outer leaf harvest: Cut outer leaves at base
- Leave center: Allow center to continue growing
- Continuous production: Harvest 2-3 times per week
- Extended harvest: Can continue for 6-8 weeks
Post-Harvest System Care:
- Clean system: Remove old roots and debris
- Fresh nutrient solution: Replace completely
- Start new seeds: Begin next crop for continuous production
Optimal Growing Conditions
Environmental Parameters
Temperature Management:
- Air temperature: 60-70°F (16-21°C) optimal
- Nutrient solution: 65-72°F (18-22°C)
- Night temperatures: Can drop 5-10°F safely
- Summer cooling: Fans, evaporative cooling, or AC in hot climates
pH and Nutrient Levels:
- pH range: 5.5-6.5 (6.0 is ideal)
- EC levels by stage:
- Seedlings (0-2 weeks): 0.8-1.0 EC
- Vegetative (2-4 weeks): 1.0-1.4 EC
- Mature (4+ weeks): 1.2-1.6 EC
Lighting Requirements:
- Duration: 12-14 hours daily
- Intensity: 20-30 DLI (Daily Light Integral)
- Spectrum: Full spectrum or 3000K-5000K
- Distance: Adjust based on light intensity and plant response
Water Quality Considerations
Source Water:
- Tap water: Usually acceptable if pH and chlorine are managed
- Well water: Test for minerals and pH
- RO water: Ideal but requires complete nutrient supplementation
- Rainwater: Good option if collected cleanly
Water Treatment:
- Chlorine removal: Let tap water sit 24 hours or use vitamin C tablets
- pH adjustment: Use pH Up/Down to reach target range
- Filtration: Basic sediment filter helpful for municipal water
Nutrient Management and Feeding Schedule
Understanding Lettuce Nutrition Needs
Primary Nutrients (NPK):
- Nitrogen (N): Most important for leaf growth – 150-200 ppm
- Phosphorus (P): Root development and energy – 50-80 ppm
- Potassium (K): Overall plant health and disease resistance – 200-300 ppm
Secondary Nutrients:
- Calcium (Ca): Cell wall strength, prevents tip burn – 150-200 ppm
- Magnesium (Mg): Chlorophyll production – 50-75 ppm
- Sulfur (S): Protein synthesis – 50-100 ppm
Micronutrients:
- Iron (Fe): Prevents yellowing between veins – 2-5 ppm
- Manganese (Mn): Photosynthesis and growth – 0.5-2 ppm
- Zinc (Zn): Enzyme function – 0.1-0.5 ppm
Commercial Nutrient Solutions
Three-Part Systems:
- General Hydroponics Flora Series: Mix equal parts Grow, Micro, Bloom
- Advanced Nutrients: pH Perfect technology reduces pH adjustment needs
- Masterblend: Professional dry nutrient formula
All-in-One Solutions:
- Liquid: Easier for beginners, more expensive per use
- Powder: More economical, requires accurate measuring
- Organic options: OMRI listed nutrients for organic production
Feeding Schedule and Recipes
Basic Lettuce Recipe (per gallon):
- Week 1-2: 1/4 strength recommended dose
- Week 3-4: 1/2 strength recommended dose
- Week 5+: Full strength recommended dose
DIY Masterblend Recipe (per gallon):
- Masterblend 4-18-38: 2.4 grams
- Calcium Nitrate: 2.4 grams
- Magnesium Sulfate: 1.2 grams
- Mix separately: Dissolve each in small amount of water first
Solution Management:
- Weekly changes: Replace entire solution weekly
- Daily top-off: Add plain water to maintain levels
- pH monitoring: Check and adjust daily if needed
- EC monitoring: Track nutrient concentration
Common Problems and Solutions
Physiological Disorders
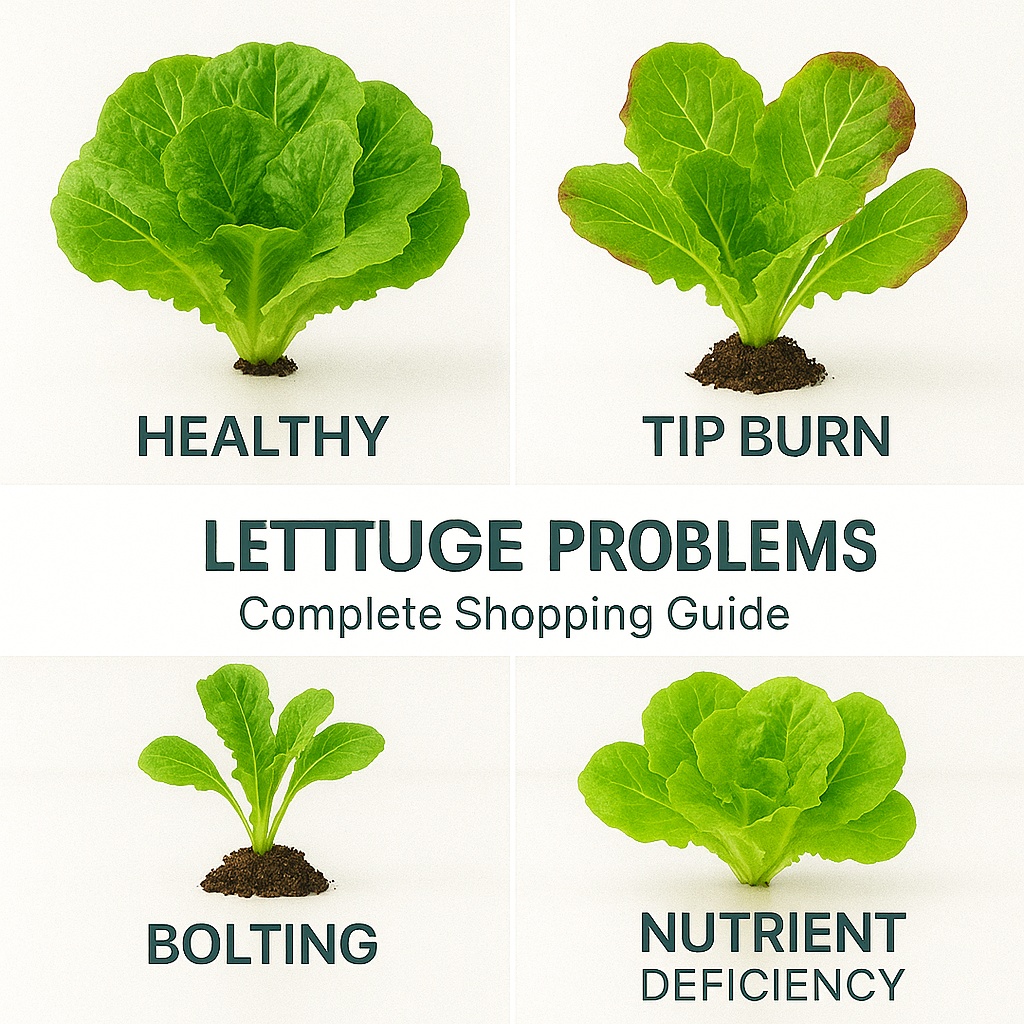
Tip Burn:
- Symptoms: Brown, crispy leaf edges
- Cause: Calcium deficiency, often from inconsistent watering
- Solution: Maintain steady moisture, check calcium levels
- Prevention: Avoid EC swings, ensure good air circulation
Bitter Taste:
- Symptoms: Unpalatable, bitter lettuce leaves
- Cause: Heat stress, nutrient imbalance, or maturity
- Solution: Lower temperature, adjust nutrients, harvest earlier
- Prevention: Maintain cool temperatures, avoid over-maturity
Bolting (Going to Seed):
- Symptoms: Tall flower stalks, bitter leaves
- Cause: Temperature stress, day length, plant maturity
- Solution: Harvest immediately, start new plants
- Prevention: Cool temperatures, timely harvest
Slow Growth:
- Symptoms: Plants remain small, pale coloring
- Cause: Insufficient light, nutrients, or temperature issues
- Solution: Check lighting, nutrient levels, and temperature
- Prevention: Proper environmental control from start
Pest and Disease Management
Aphids:
- Identification: Small, soft-bodied insects on leaves
- Treatment: Insecticidal soap, beneficial insects
- Prevention: Clean growing environment, quarantine new plants
Fungal Issues:
- Symptoms: Gray mold, damping off, root rot
- Cause: Poor air circulation, overwatering, contamination
- Treatment: Remove affected plants, improve ventilation
- Prevention: Sterile techniques, proper spacing
Algae Growth:
- Symptoms: Green slime in nutrient solution
- Cause: Light exposure to nutrients, warm temperatures
- Treatment: Clean system, block light, reduce nutrients temporarily
- Prevention: Opaque reservoirs, proper system design
System-Related Problems
pH Drift:
- Symptoms: pH constantly rising or falling
- Cause: Nutrient uptake, microbial activity, poor buffers
- Solution: More frequent monitoring, better nutrients
- Prevention: Quality nutrient solutions, regular changes
Pump Failures:
- Symptoms: No water circulation, plant stress
- Cause: Clogged pumps, power issues, worn equipment
- Solution: Clean or replace pump, check power supply
- Prevention: Regular maintenance, backup equipment
Nutrient Deficiencies:
- Symptoms: Yellowing, stunted growth, poor color
- Cause: Incorrect concentrations, pH lockout, poor nutrients
- Solution: Adjust concentrations, check pH, fresh nutrients
- Prevention: Follow feeding schedules, quality nutrients
Maximizing Yields and Quality
Succession Planting Strategy
Continuous Harvest System:
- Start new seeds every 2 weeks
- Stagger planting in multiple systems
- Maintain 4-6 week harvest cycle
- Plan for 3-4 plantings simultaneously
Production Planning:
- Family of 4: Start 8-12 plants every 2 weeks
- Single person: Start 4-6 plants every 2 weeks
- Commercial scale: Calculate based on weekly sales needs
Advanced Growing Techniques
Spacing Optimization:
- Young plants: 2-3 inches apart initially
- Mature spacing: 4-6 inches for leaf lettuce, 6-8 inches for head lettuce
- Vertical spacing: Multiple tiers possible with proper lighting
Environmental Fine-Tuning:
- CO2 supplementation: 800-1200 ppm for enhanced growth
- Humidity control: 50-70% RH optimal
- Air movement: Gentle circulation prevents disease
Nutrient Cycling:
- Electrical conductivity management: Gradually increase with plant size
- Micronutrient supplementation: Weekly additions of iron, calcium
- Organic additives: Kelp meal, fish emulsion for enhanced flavor
Quality Enhancement
Flavor Development:
- Harvest timing: Early morning harvest for best flavor
- Pre-harvest fasting: Reduce nutrients 3-5 days before harvest
- Cool storage: Immediate refrigeration maintains quality
Appearance Optimization:
- Colored varieties: Higher light intensity enhances coloration
- Uniform spacing: Consistent plant sizing and appearance
- Clean harvest: Remove any damaged or diseased leaves
Nutritional Content:
- Optimal nutrient ratios: Higher potassium enhances vitamin content
- Light spectrum: Full spectrum LED improves nutrient density
- Harvest maturity: Peak nutrition just before bolting
Economics and Scaling Up
Cost Analysis
Initial Investment (5-gallon system):
- Basic DWC system: $50-100
- pH and EC meters: $40-80
- LED grow light: $50-150
- Seeds and nutrients: $30-50
- Total startup: $170-380
Operating Costs (per month):
- Electricity (lighting): $15-25
- Nutrients: $5-10
- Seeds: $3-5
- Water: $2-5
- Monthly total: $25-45
Return on Investment:
- Harvest: 12-20 heads per month (5-gallon system)
- Store equivalent: $36-100 per month
- Net savings: $10-55 per month
- Payback period: 3-8 months
Commercial Production Considerations
Market Analysis:
- Local restaurants: Premium pricing for ultra-fresh lettuce
- Farmers markets: Direct sales to consumers
- CSA programs: Community-supported agriculture shares
- Online sales: Specialty varieties and microgreens
Scaling Strategies:
- Multiple small systems: Easier management, staggered harvests
- Larger commercial systems: NFT or ebb-and-flow for efficiency
- Vertical growing: Maximize space utilization
- Automation: Timers, monitoring systems, and automatic feeders
Regulatory and Certification
Food Safety:
- GAP certification: Good Agricultural Practices
- Organic certification: OMRI-listed nutrients required
- Local regulations: Health department requirements
- Insurance: Product liability for commercial sales
Advanced Tips and Troubleshooting
Expert Growing Techniques
Root Zone Management:
- Water temperature: Keep nutrient solution 65-72°F
- Dissolved oxygen: Minimum 5 ppm for healthy roots
- Root pruning: Remove brown or slimy roots promptly
Seasonal Adaptations:
- Summer growing: Increase cooling, reduce light intensity
- Winter growing: Supplemental heating, longer photoperiods
- Spring/fall: Optimal conditions, maximum production
Variety Selection for Conditions:
- Hot climates: Heat-tolerant varieties like Jericho, Nevada
- Cool climates: Standard varieties perform excellently
- Low light: Compact varieties like Tom Thumb, Little Gem
Professional Growing Secrets
Timing Optimization:
- Germination: 65-75°F accelerates sprouting
- Transplant timing: Move to system when 2-3 true leaves appear
- Harvest windows: Early morning for best quality and longest storage
Nutrient Precision:
- Individual element tracking: Monitor calcium and iron separately
- pH buffering: Add potassium bicarbonate for stability
- Micronutrient cycling: Weekly iron and calcium supplementation
System Hygiene:
- Bleach cleaning: 10% bleach solution between crops
- Beneficial bacteria: Inoculate with hydroponic-safe microorganisms
- Quarantine protocols: Isolate new plants for 1-2 weeks
Conclusion: Your Path to Hydroponic Lettuce Success
Growing lettuce hydroponically represents the perfect introduction to soilless cultivation. With its forgiving nature, quick results, and exceptional quality, lettuce offers new growers the confidence and skills needed to tackle more challenging crops.
Key takeaways for success:
- Start simple with a basic DWC system and easy varieties
- Monitor consistently but don’t over-adjust pH and nutrients
- Maintain cool temperatures for best flavor and growth
- Plan succession plantings for continuous harvests
- Keep detailed records to improve future crops
Your next steps:
- Choose your system type and gather equipment
- Select beginner-friendly varieties like Black Seeded Simpson
- Start with a small 4-6 plant system to learn the basics
- Focus on maintaining proper pH, nutrients, and temperature
- Document your results and gradually expand your operation
Remember, every expert hydroponic grower started with their first lettuce plant. The key is to begin, learn from each crop, and continuously improve your techniques.
Ready to expand your hydroponic garden? Check out our guides for growing hydroponic basil or building your own DWC system. For questions about lettuce growing or troubleshooting specific problems, contact us – we love helping fellow growers succeed!