Choosing the right hydroponic tomato systems is crucial for your growing success. With proper system selection and setup, you can achieve the exceptional yields and faster growth rates that make hydroponic tomato systems so appealing to both beginners and commercial growers.
Building on the variety selection and planning covered in Part 1 of our series, this guide explores the 6 most effective hydroponic tomato systems, their setup requirements, and equipment recommendations.
Understanding Hydroponic Tomato Systems
Different hydroponic tomato systems deliver nutrients and water to plants through various methods. Each system has unique advantages, costs, and complexity levels that make them suitable for different growing situations and experience levels.
The key to successful hydroponic tomato systems lies in understanding how each delivers the three essential elements: nutrients, water, and oxygen to the root zone. Research from Cornell University shows that optimal root zone conditions can increase hydroponic tomato yields by 40-60% compared to suboptimal setups [1].
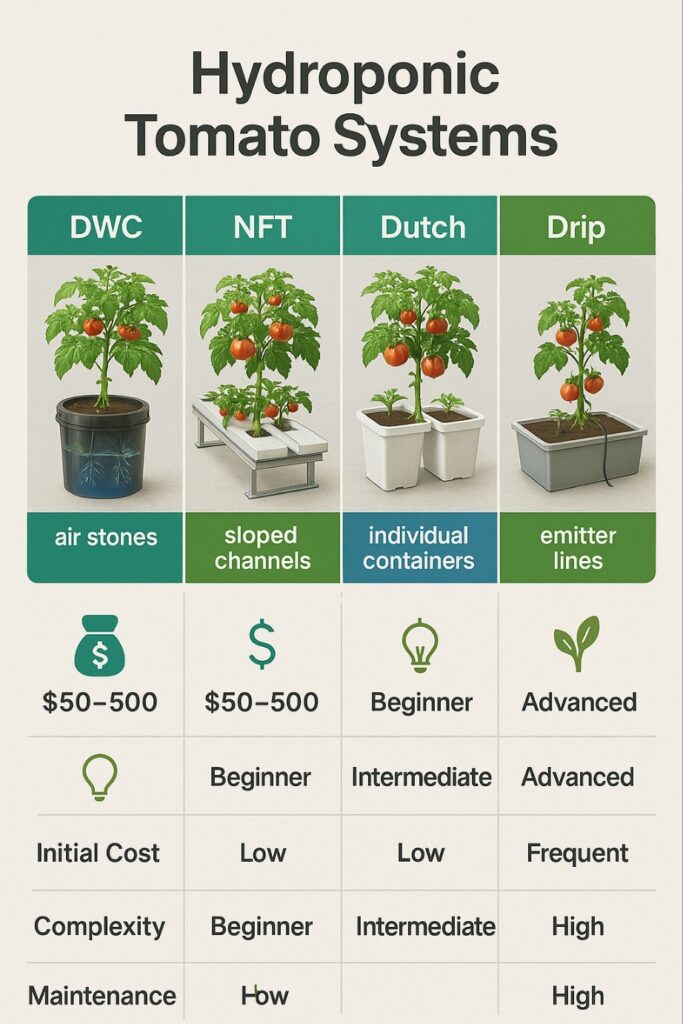
Deep Water Culture (DWC) – Best for Beginners
Deep Water Culture represents one of the simplest and most cost-effective hydroponic tomato systems for home growers. Plants sit in net pots suspended over a reservoir of nutrient solution, with roots hanging directly into the oxygenated water.
DWC System Components
- Reservoir: 5-gallon bucket per plant minimum
- Net pots: 3-6 inch diameter for tomato seedlings
- Air pump and stones: Provides essential root oxygenation
- Growing medium: Hydroton clay pebbles or rockwool
- Lid: Light-proof cover to prevent algae growth
DWC Setup Process
- Prepare reservoir: Clean 5-gallon bucket with lid
- Install net pot holes: Cut 3-inch holes in lid
- Add aeration: Install air stone connected to pump
- Fill with solution: Add nutrients to proper EC levels
- Plant seedlings: Secure in net pots with growing medium
DWC Advantages and Considerations
Advantages:
- Low initial cost ($30-50 per plant)
- Simple maintenance routine
- Excellent for cherry tomato varieties
- Fast root development
Considerations:
- Requires daily monitoring in hot weather
- Limited to smaller plant varieties
- Power outage affects oxygenation
For comprehensive information about hydroponic nutrients and feeding, our pH and EC guide provides essential background.
Nutrient Film Technique (NFT) – Professional Choice
NFT hydroponic tomato systems continuously circulate a thin film of nutrient solution past plant roots in sloped channels. This system offers excellent control and efficiency, making it popular in commercial operations.
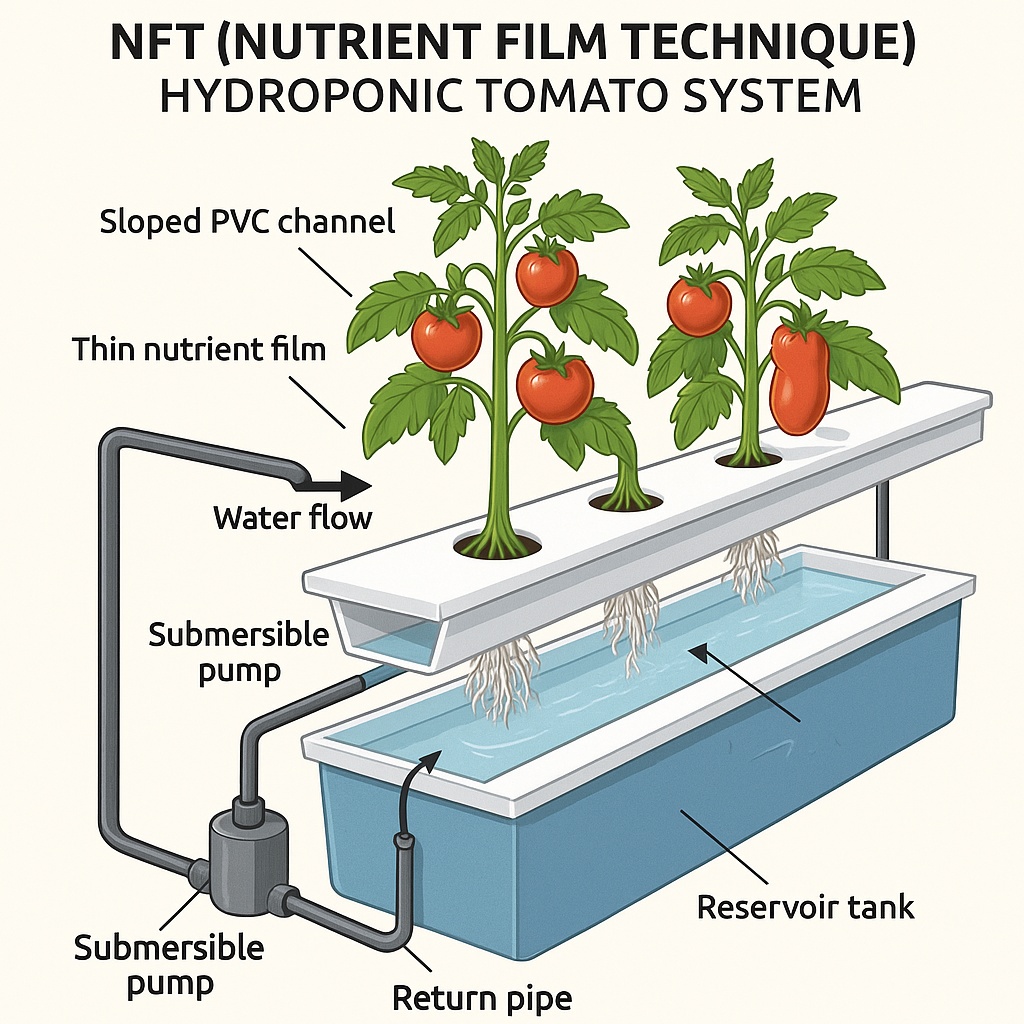
NFT System Components
- Growing channels: PVC pipes or specialized NFT channels
- Reservoir tank: 20-50 gallons depending on plant count
- Water pump: Submersible pump with timer
- Return system: Gravity-fed collection and return
- Support structure: Frame to maintain proper slope
NFT Setup Requirements
- Channel preparation: 4-inch PVC with net pot holes every 12 inches
- Slope calculation: 1:40 ratio (1 inch drop per 40 inches length)
- Pump installation: Size pump for 1-2 gallons per minute flow
- Timer programming: 15 minutes on, 15 minutes off cycles
- Backup systems: Overflow drains and alarm systems
NFT Performance Benefits
- Water efficiency: Uses 90% less water than soil growing
- Nutrient control: Precise delivery and monitoring
- Scalability: Easy to expand system size
- Root health: Constant air exposure prevents root rot
Dutch Bucket System – Best for Large Tomatoes
Dutch bucket hydroponic tomato systems excel at supporting large, indeterminate varieties like beefsteak tomatoes. Each plant grows in an individual bucket filled with growing medium, receiving periodic nutrient feedings.
Dutch Bucket Components
- Individual buckets: 3-5 gallon containers per plant
- Growing medium: Perlite, coco coir, or expanded clay
- Drip irrigation: Individual emitters for each bucket
- Collection system: Drain tubes and return reservoir
- Support structures: Stakes or trellising for large plants
Dutch Bucket Setup Guide
- Bucket preparation: Drill drainage holes 2 inches from bottom
- Medium installation: Fill with chosen growing medium
- Irrigation setup: Install drip emitters and tubing
- Drainage system: Connect collection tubes to return reservoir
- Support installation: Install trellising for plant support
Dutch Bucket Advantages
- Individual plant control: Isolated root zones prevent disease spread
- Large plant support: Handles 20+ pound mature plants
- Medium flexibility: Various growing media options
- Easy maintenance: Individual bucket access for monitoring
Ebb and Flow (Flood and Drain) Systems
Ebb and flow hydroponic tomato systems periodically flood growing beds with nutrient solution, then drain back to the reservoir. This creates excellent root oxygenation cycles while providing consistent nutrition.
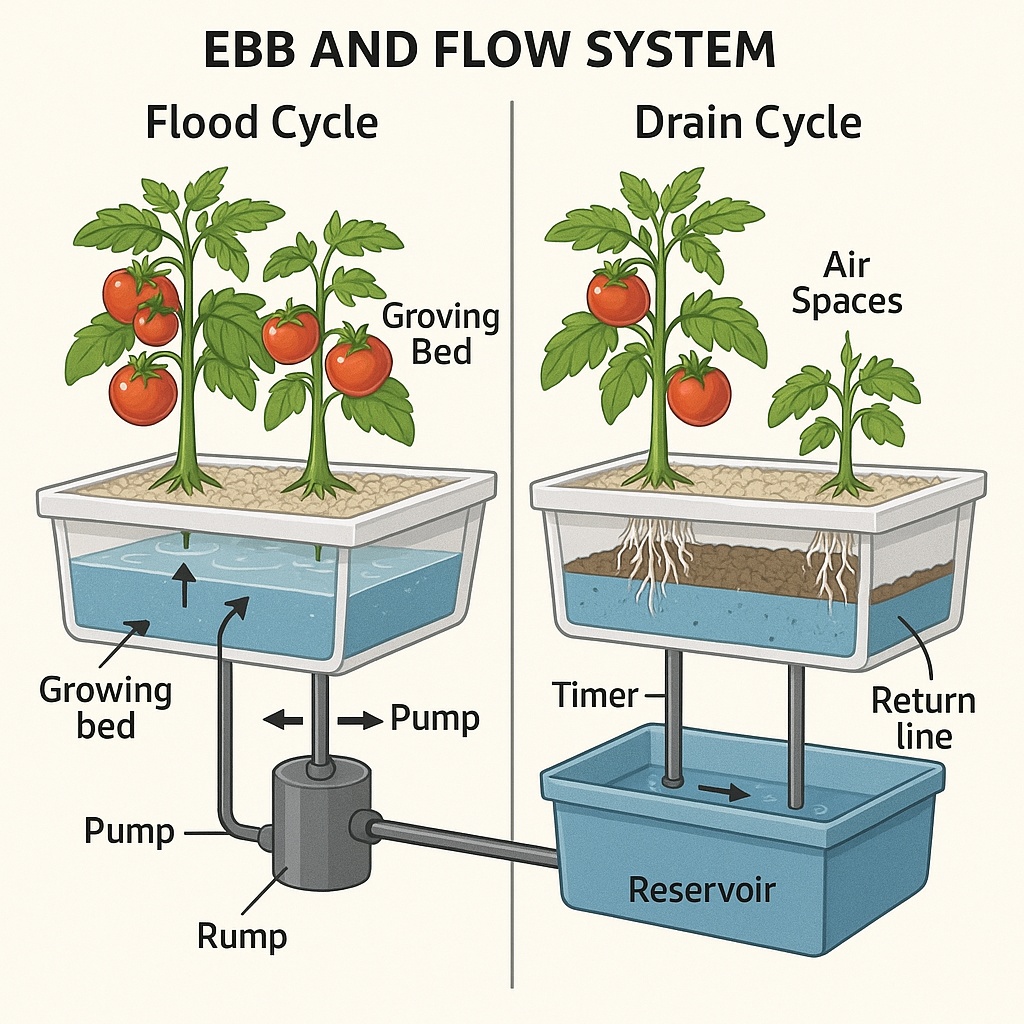
Ebb and Flow Components
- Growing bed: Large tray or table to hold plants
- Reservoir: Located below growing bed level
- Submersible pump: With timer for flood cycles
- Overflow fitting: Prevents overfilling
- Growing medium: Rockwool, perlite, or hydroton clay
Flood Cycle Programming
Seedling stage: 3-4 floods per day, 15 minutes each Vegetative growth: 4-6 floods per day, 15-20 minutes each
Flowering/fruiting: 6-8 floods per day, 15-20 minutes each
System Timing Considerations
Flood frequency depends on several factors:
- Plant size: Larger plants need more frequent watering
- Environmental conditions: Higher temperatures require more floods
- Growing medium: Different media retain water differently
- Root development: Established roots can handle longer dry periods
Drip System Setup for Tomatoes
Drip hydroponic tomato systems deliver nutrient solution directly to each plant’s root zone through individual emitters. This method offers excellent water efficiency and precise control over feeding schedules.
Drip System Design
- Main line: 1/2 inch tubing from reservoir to growing area
- Branch lines: 1/4 inch tubes to individual plants
- Emitters: Adjustable drippers, 1-4 GPH capacity
- Timer control: Multiple daily feeding cycles
- Runoff collection: Catch trays and return system
Drip Feeding Schedules
Week 1-2: 2-3 feedings daily, 5-10 minutes each Week 3-6: 4-5 feedings daily, 10-15 minutes each Week 7+: 6-8 feedings daily, 15-20 minutes each
For detailed guidance on nutrient scheduling and management, Part 3 of our series covers feeding strategies in depth.
Aeroponic Systems – Advanced Option
Aeroponic hydroponic tomato systems suspend plant roots in air and mist them with nutrient solution. While more complex, aeroponics offers the fastest growth rates and highest yields possible.
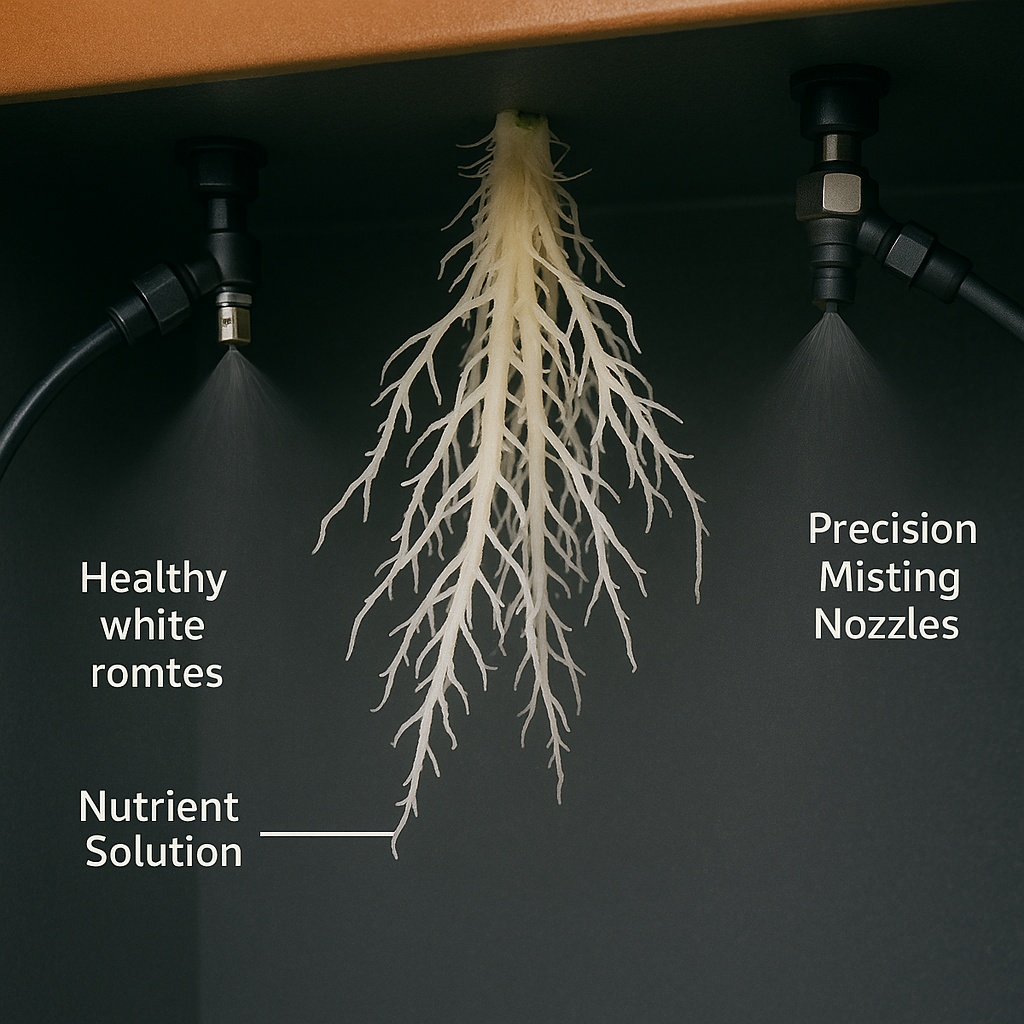
Aeroponic Requirements
- Pressure pump: 40-60 PSI for proper misting
- Misting nozzles: Fine spray pattern, 50-100 micron droplets
- Timer precision: Seconds-based control for misting cycles
- Backup systems: Multiple pumps prevent system failure
- Root chamber: Light-proof environment for root development
Aeroponic Benefits and Challenges
Benefits:
- Fastest growth: 25-50% faster than other systems
- Maximum yields: Optimal nutrient and oxygen delivery
- Water efficiency: Minimal water usage
- Root observation: Easy monitoring of root health
Challenges:
- Higher complexity: Requires technical knowledge
- Power dependency: System failure affects plants quickly
- Initial cost: $200-500+ per plant setup
- Maintenance: Regular nozzle cleaning required
Choosing Your Hydroponic Tomato System
Selecting the right hydroponic tomato systems depends on several key factors:
Experience Level Recommendations
Complete beginners: Start with DWC or simple drip systems Some experience: NFT or Dutch bucket systems offer good growth Advanced growers: Ebb and flow or aeroponic systems for maximum control
Budget Considerations
Low budget ($50-200): DWC or basic drip systems Medium budget ($200-800): NFT or Dutch bucket setups High budget ($800+): Professional NFT or aeroponic systems
Space and Plant Count
1-4 plants: DWC or Dutch buckets work well 5-20 plants: NFT or ebb and flow systems scale efficiently 20+ plants: Commercial NFT or Dutch bucket operations
Essential Equipment for All Systems
Regardless of which hydroponic tomato systems you choose, certain equipment remains essential:
Monitoring Equipment
- pH meter: Digital meter with automatic temperature compensation
- EC/TDS meter: For monitoring nutrient concentrations
- Thermometer: Air and water temperature monitoring
- Timer systems: Reliable power and backup options
Support and Training Equipment
For guidance on plant training and support methods, Part 4 covers trellising and pruning techniques.
Environmental Controls
- Ventilation fans: Air circulation and temperature control
- Grow lights: LED or HPS for indoor growing
- Humidity control: Dehumidifiers or humidifiers as needed
Common Setup Mistakes to Avoid
Learning from common errors can save time and prevent crop losses:
- Undersized reservoirs: Use minimum 5 gallons per large plant
- Poor drainage: Ensure proper runoff collection and return
- Inadequate aeration: Root oxygenation critical for health
- Improper pH management: Monitor and adjust regularly
- System redundancy: Have backup pumps and power sources
Frequently Asked Questions
Q: Which hydroponic tomato system produces the highest yields? A: Aeroponic and well-managed NFT hydroponic tomato systems typically produce the highest yields, often 40-60% more than soil growing when properly maintained.
Q: Can I start with a simple system and upgrade later? A: Yes! Many growers start with DWC or drip systems to learn basics, then upgrade to NFT or Dutch bucket systems as experience grows.
Q: How much does it cost to set up hydroponic tomato systems? A: Basic DWC systems start around $50 per plant, while commercial NFT or aeroponic systems can cost $200-500+ per plant for complete setups.
Q: Do I need different systems for different tomato varieties? A: Cherry tomatoes work well in any system, while large indeterminate varieties perform better in Dutch bucket or NFT hydroponic tomato systems that provide better support.
Q: How often should I change the nutrient solution? A: Most hydroponic tomato systems require complete solution changes every 2-3 weeks, with daily top-offs and weekly monitoring of pH and EC levels.
Preparing for Nutrient Management
With your hydroponic tomato system selected and installed, the next critical step involves nutrient management and feeding schedules. Part 3 of our series covers detailed feeding strategies, pH management, and troubleshooting nutrient deficiencies.
Proper system setup creates the foundation for healthy plant growth, but understanding nutrient delivery ensures you achieve maximum yields from your hydroponic tomato systems. The investment in quality equipment and proper installation pays dividends in faster growth, higher yields, and fewer problems throughout the growing season.
For troubleshooting common issues that may arise, Part 5 covers problem diagnosis and solutions.
References
[1] Cornell University Controlled Environment Agriculture Program. “Hydroponic Tomato Production Systems Comparison.” Department of Horticulture, 2023.
Complete Hydroponic Tomatoes Series: