Walking into a hydroponic store for the first time can feel overwhelming. Rows of pumps, lights, meters, nutrients, and mysterious gadgets line the shelves, each promising to be “essential” for your hydroponic success. But what do you actually need to get started?
The truth is, successful hydroponic growing doesn’t require breaking the bank or filling a garage with equipment. With the right essential items – and knowing what you can skip initially – you can start growing healthy plants without the overwhelm or overspending.
In this comprehensive equipment guide, we’ll walk through exactly what you need for your first hydroponic system, how to choose quality equipment on any budget, and what you can add later as you expand your growing operation. By the end, you’ll have a clear shopping list and the confidence to make smart equipment decisions.
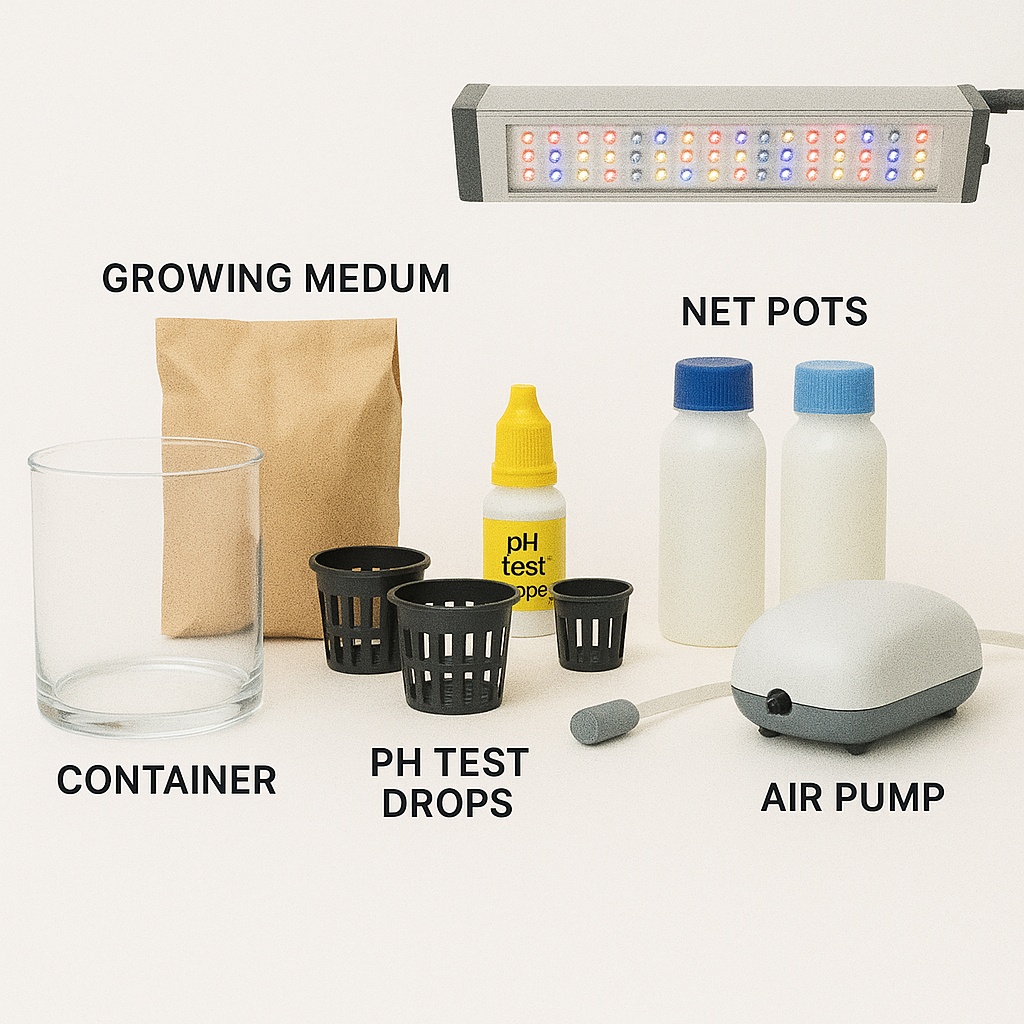
The Minimalist Starter Kit: What You Absolutely Need
Before we dive into all the options available, let’s start with the bare minimum equipment needed for a basic hydroponic setup:
The “Must-Have” List:
- Growing container/reservoir
- Growing medium (like perlite or coconut coir)
- Net pots or growing cups
- pH testing method
- Basic nutrients
- Air pump and air stone (for most systems)
- Basic lighting (if growing indoors)
Budget for bare minimum: $75-150
This simple setup can successfully grow herbs, lettuce, and other small plants. Everything else we’ll discuss are improvements and expansions, not absolute necessities.
Container and Reservoir Systems
Choosing Your Growing Container
Size Considerations:
- Small herbs: 2-5 gallon containers
- Lettuce and greens: 5-10 gallon containers
- Larger plants: 10+ gallon reservoirs
- Multiple plants: 20+ gallon systems
Material Options:
Food-Grade Plastic (Recommended):
- Pros: Inexpensive, lightweight, easy to modify
- Cons: Can become brittle over time
- Best for: Beginners, temporary setups
- Cost: $10-30
High-Density Polyethylene (HDPE):
- Pros: Very durable, chemical resistant, long-lasting
- Cons: More expensive than basic plastic
- Best for: Permanent installations
- Cost: $25-75
Storage Totes (Budget Option):
- Pros: Widely available, very inexpensive
- Cons: May not be food-grade, limited sizes
- Best for: First-time experiments
- Cost: $8-20
Important Container Features
Opaque Walls: Essential to prevent algae growth. If your container is clear, you’ll need to cover it with aluminum foil or black plastic.
Tight-Fitting Lid: Prevents debris from falling in and reduces evaporation. Should be easy to remove for maintenance.
Easy Modification: Look for containers that are easy to drill for airline holes, net pot openings, and drainage if needed.
Graduated Markings: Helpful for tracking water levels and calculating nutrient additions.
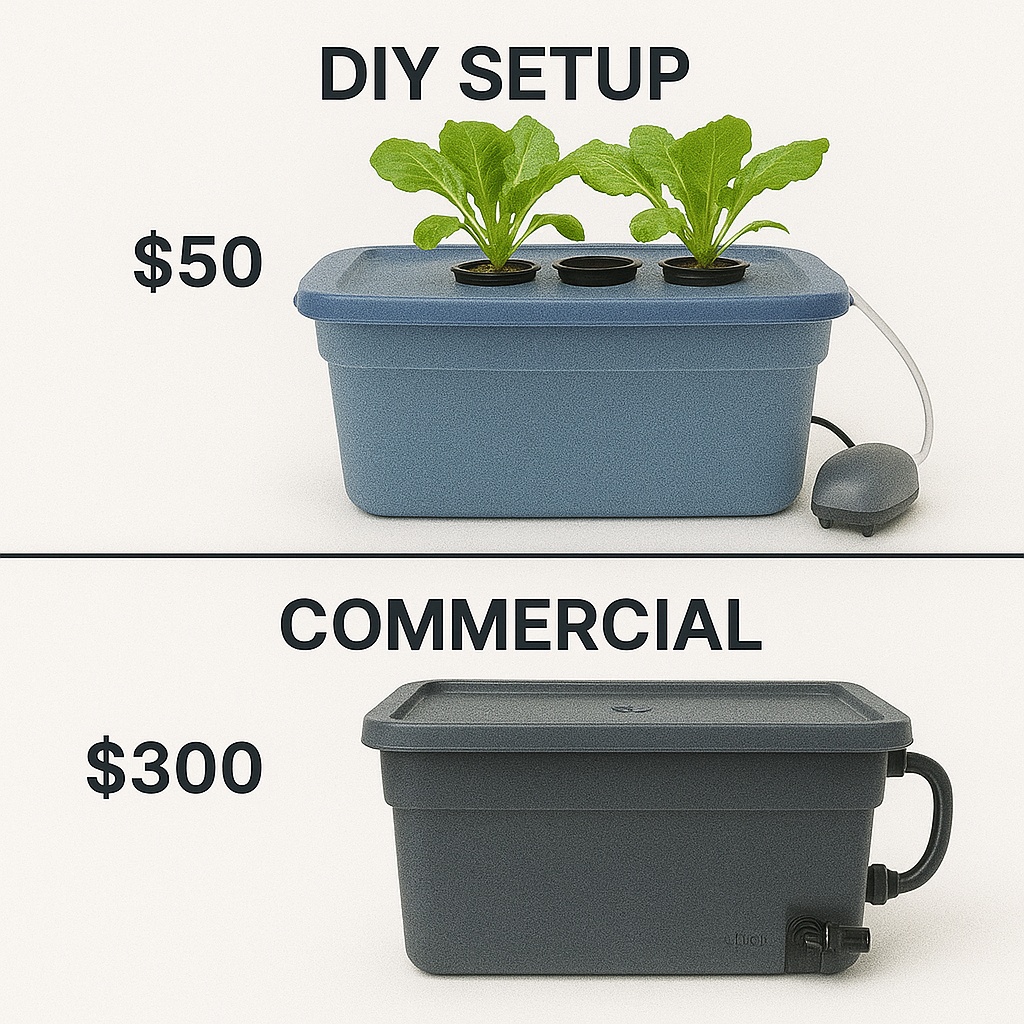
DIY vs. Commercial Reservoirs
DIY Advantages:
- Much less expensive
- Can customize to your space
- Easy to replace or modify
- Available at any hardware store
Commercial Advantages:
- Designed specifically for hydroponics
- Often include convenient features
- Professional appearance
- May include guarantees
Budget Comparison:
- DIY setup: $15-40
- Commercial reservoir: $50-200
Growing Medium Options
Understanding Growing Medium Purpose
Growing medium in hydroponics serves three main functions:
- Physical support for plant roots and stems
- Moisture retention while allowing drainage
- Air space for root oxygenation
Unlike soil, hydroponic growing media don’t provide nutrition – they’re just a physical environment for roots.
Popular Growing Medium Options
Expanded Clay Pebbles (Hydroton):
- Description: Lightweight, round clay balls
- Pros: Reusable, excellent drainage, pH neutral
- Cons: More expensive, needs rinsing before use
- Best for: NFT systems, flood and drain
- Cost: $15-25 per 25L bag
Perlite:
- Description: Volcanic glass that’s been heated and expanded
- Pros: Very inexpensive, excellent aeration
- Cons: Dusty, can float, not reusable
- Best for: Deep water culture, mixing with other media
- Cost: $10-15 per large bag
Vermiculite:
- Description: Expanded mica that retains moisture well
- Pros: Great water retention, inexpensive
- Cons: Can become compacted, holds too much water for some systems
- Best for: Mixing with perlite, seed starting
- Cost: $8-12 per bag
Coconut Coir:
- Description: Fiber from coconut husks
- Pros: Sustainable, good water retention, pH buffering
- Cons: Can retain too much water, may contain salts
- Best for: Drip systems, mixed with perlite
- Cost: $10-20 per compressed block
Rockwool:
- Description: Spun rock fibers, similar to insulation
- Pros: Sterile, excellent for seed starting, uniform structure
- Cons: Not environmentally friendly, can be irritating to skin
- Best for: Professional growing, seed starting
- Cost: $15-30 per pack
Perlite/Vermiculite Mix (Best for Beginners):
- Ratio: 50/50 or 60/40 perlite to vermiculite
- Pros: Combines drainage and water retention perfectly
- Cons: Need to mix yourself
- Best for: Most hydroponic systems
- Cost: $12-20 total
Growing Medium Selection Guide
For Deep Water Culture:
- Primary: Expanded clay pebbles
- Budget option: Perlite in net pots
For NFT Systems:
- Primary: Expanded clay pebbles
- Alternative: Rockwool cubes
For Drip Systems:
- Primary: Coir/perlite mix
- Alternative: Straight perlite
For Ebb and Flow:
- Primary: Expanded clay pebbles
- Alternative: Perlite/vermiculite mix
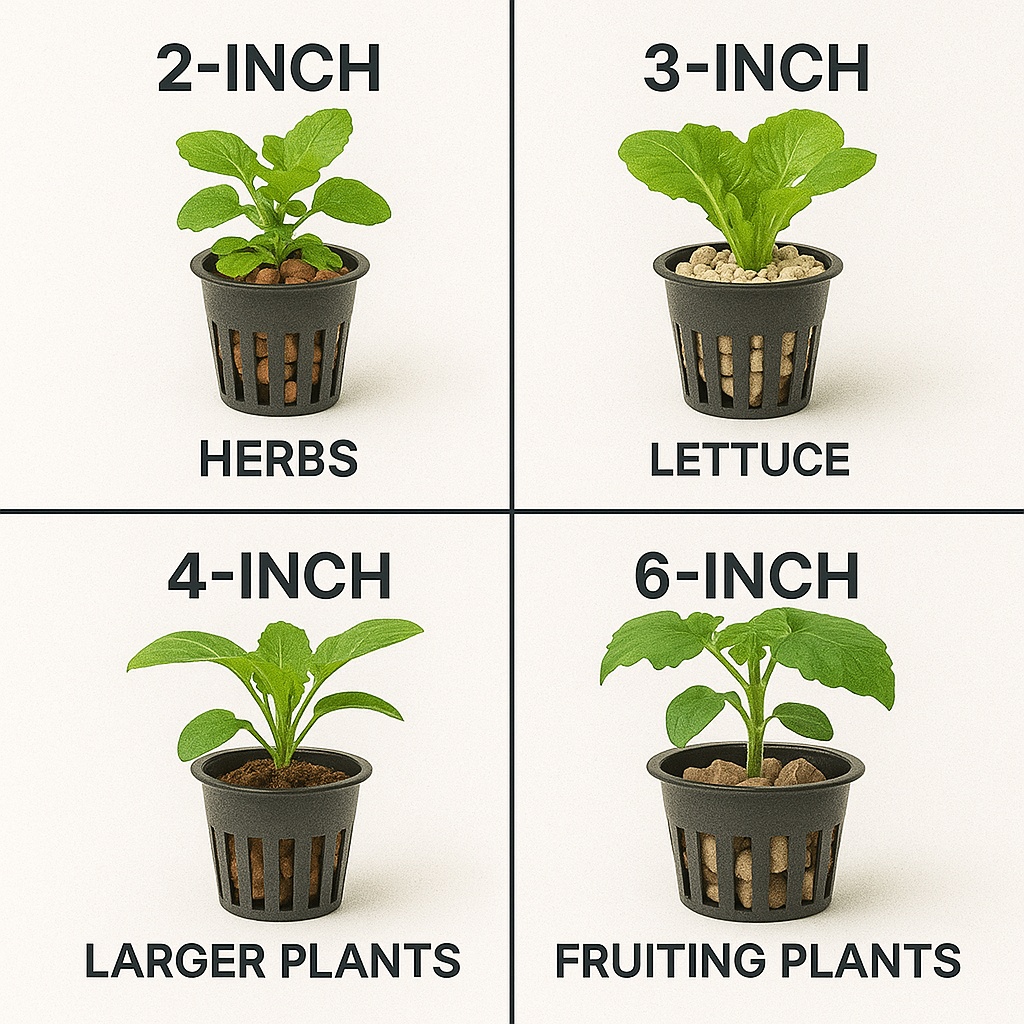
Net Pots and Plant Containers
Net Pot Basics
Net pots are plastic containers with holes or slits that allow roots to grow through while supporting the plant and growing medium.
Standard Sizes:
- 2 inch: Small herbs, microgreens
- 3 inch: Most herbs, lettuce, small plants
- 4 inch: Larger herbs, small fruiting plants
- 6 inch: Large plants, tomatoes, peppers
Material Options:
- Plastic: Most common, inexpensive, reusable
- Biodegradable: Break down over time, good for transplanting
- Mesh: Fine openings, good for small seeds
Choosing the Right Size
For Seedlings: Start with 2-3 inch pots and transplant to larger ones as plants grow.
For Direct Seeding: Use the final size pot from the beginning to avoid transplant shock.
For Long-term Growing: Choose pots that will accommodate the plant’s full root system.
DIY Alternatives
Yogurt Cups:
- Drill holes in the bottom and sides
- Cost: Nearly free
- Good for: Experimentation and testing
Plastic Cups:
- Use disposable cups with holes
- Cost: Very inexpensive
- Good for: Temporary setups
Mason Jar Lids:
- Drill large hole in lid for net pot
- Cost: $5-10
- Good for: Single-plant systems
Testing and Monitoring Equipment
pH Testing Options
Digital pH Meters:
Budget Digital Meters ($15-35):
- Accuracy: ±0.1-0.2 pH
- Features: Basic reading, manual calibration
- Best for: Beginners on tight budgets
- Brands: Generic, Sonkir, Bluelab Budget
Mid-Range Digital Meters ($35-75):
- Accuracy: ±0.1 pH
- Features: Automatic temperature compensation, better calibration
- Best for: Serious beginners, regular use
- Brands: Apera, Hanna Instruments
Professional Meters ($75-200):
- Accuracy: ±0.01 pH
- Features: Replaceable probes, advanced calibration, data logging
- Best for: Commercial growing, precision applications
- Brands: Bluelab, Hanna Professional
Alternative Testing Methods:
pH Test Drops ($5-10):
- Add drops to nutrient solution sample
- Color change indicates pH level
- Good backup method for digital meters
pH Test Strips ($5-10):
- Dip strip in solution and compare colors
- Less accurate but very simple
- Good for quick checks
EC/TDS Testing
Digital EC Meters:
Basic EC Meters ($15-30):
- Features: EC and TDS readings, temperature display
- Accuracy: ±2% of reading
- Best for: Home growing, basic monitoring
Advanced EC Meters ($30-100):
- Features: Multiple measurement scales, better accuracy, data logging
- Accuracy: ±1% of reading
- Best for: Serious growers, multiple systems
Thermometer Options
Digital Thermometers ($5-15):
- Features: Instant reading, min/max memory
- Types: Probe type for water, ambient for air
- Best for: Monitoring both air and water temperature
Thermometer/Hygrometer Combos ($10-25):
- Features: Temperature and humidity in one unit
- Best for: Indoor growing environments
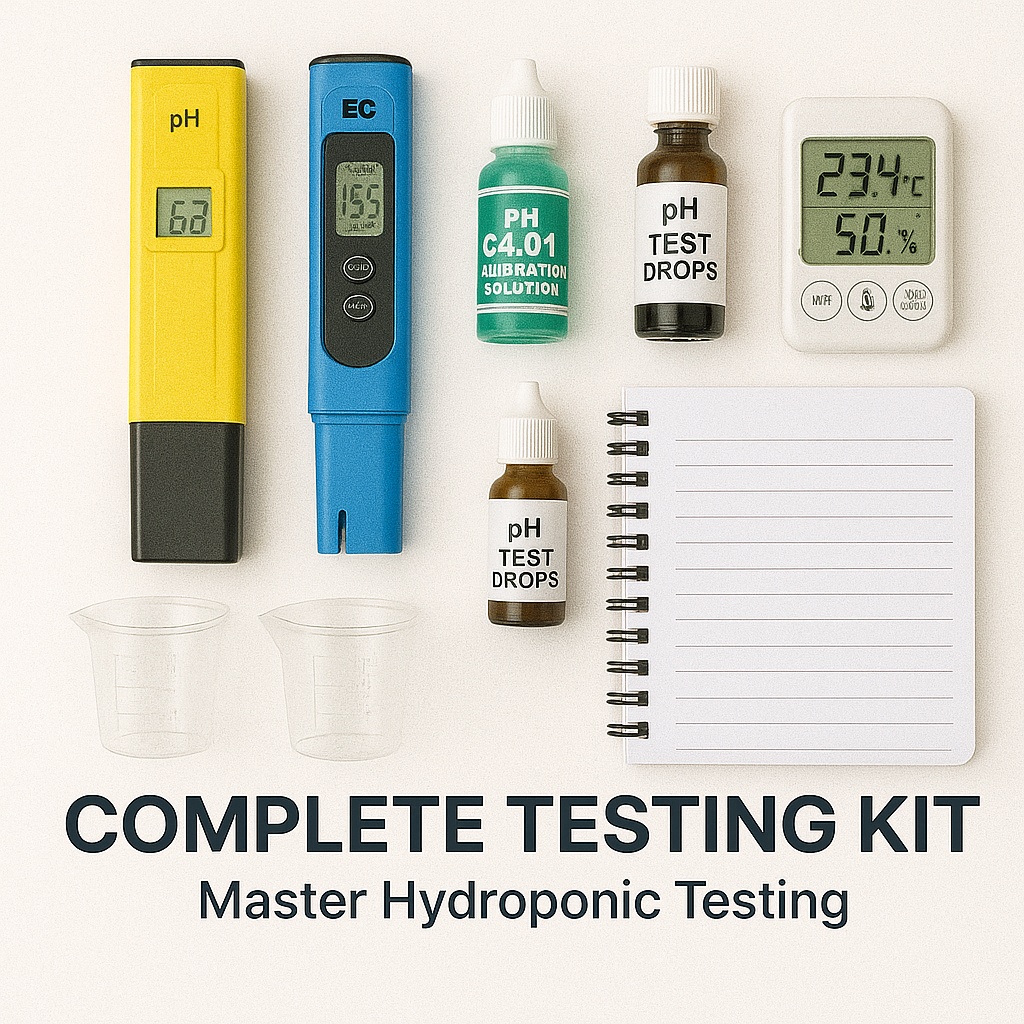
Creating a Testing Kit
Basic Testing Kit ($35-60):
- Budget pH meter: $20
- Basic EC meter: $15
- pH test drops (backup): $5
- Small measuring cups: $5
- Testing log notebook: $5
Professional Testing Kit ($100-150):
- Quality pH meter: $50
- Quality EC meter: $35
- Calibration solutions: $15
- Digital thermometer: $10
- pH adjusters: $15
- Storage solutions: $10
Air Pumps and Aeration
Why Aeration Matters
Most hydroponic systems require active aeration to deliver oxygen to plant roots. Without adequate oxygen, roots will rot and plants will die.
Systems That Need Aeration:
- Deep Water Culture (DWC)
- Ebb and Flow (during flood cycles)
- Some drip systems
Systems That Don’t Need Pumps:
- NFT (gravity-fed)
- Wick systems
- Some aeroponic systems
Choosing an Air Pump
Pump Size Calculation:
- Rule of thumb: 1 watt per gallon of nutrient solution
- For 5-gallon system: 5-watt pump minimum
- For 20-gallon system: 20-watt pump minimum
Single vs. Multi-Outlet Pumps:
Single Outlet ($10-25):
- Powers one air stone
- Good for small systems
- Quieter operation
- Examples: 2-5 watt pumps
Multi-Outlet ($25-75):
- Can power multiple air stones
- Better for larger or multiple systems
- More versatile but louder
- Examples: 10-50 watt pumps
Air Stones and Diffusers
Air Stone Types:
Cylinder Air Stones ($2-5 each):
- Most common type
- Good general-purpose aeration
- Easy to replace
Disc Air Stones ($5-10 each):
- Produce finer bubbles
- More efficient oxygen transfer
- Better for deep systems
Flexible Air Curtains ($10-20):
- Long strips that create walls of bubbles
- Excellent for large systems
- More even distribution
Airline and Connectors
Airline Tubing:
- Use aquarium-grade tubing
- 1/4 inch diameter most common
- Buy 25-50 feet for flexibility
- Cost: $5-15
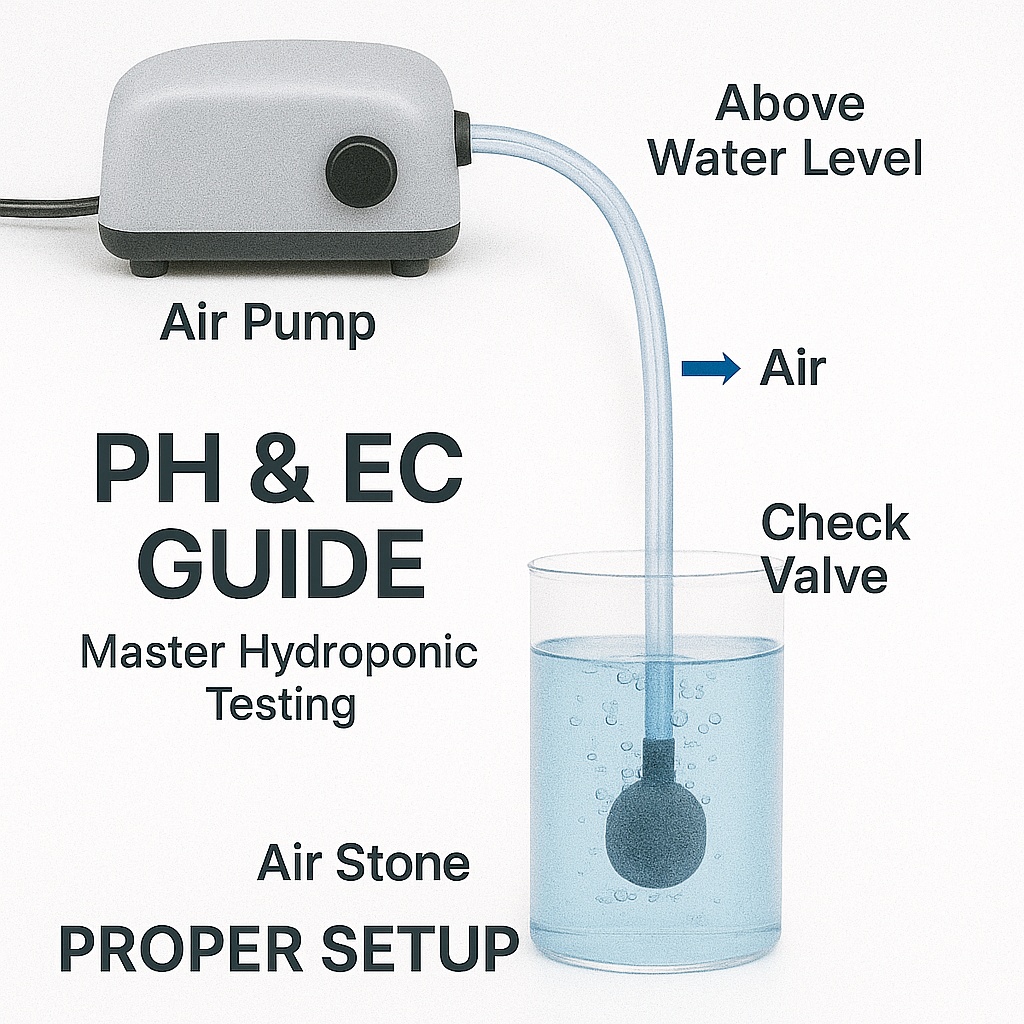
Check Valves ($2-5 each):
- Prevent water from back-flowing into pump
- Essential for system safety
- Install near pump, not air stone
Air Flow Adjusters ($3-8 each):
- Control air flow to individual stones
- Useful for balancing multiple air stones
- Install between pump and air stone
Pump Placement and Setup
Pump Positioning:
- Place pump higher than water level when possible
- Use check valves if pump must be below water
- Ensure good ventilation around pump
- Keep pump dry and accessible
Noise Reduction:
- Place pump on foam pad to reduce vibration
- Keep tubing from vibrating against surfaces
- Consider pump noise when choosing location
- Some pumps are specifically designed for quiet operation
Lighting for Indoor Growing
When You Need Grow Lights
Situations Requiring Artificial Lighting:
- Growing completely indoors
- Insufficient natural light (less than 6 hours direct sun)
- Year-round growing in cold climates
- Faster growth desired
Situations Where Natural Light Works:
- South-facing windows with 6+ hours direct sun
- Greenhouse or covered outdoor growing
- Supplementing natural light during winter
LED Grow Lights (Recommended)
Why LEDs Are Best for Beginners:
- Lower heat production
- Energy efficient
- Long lifespan (50,000+ hours)
- Available in full spectrum
- Prices have come down significantly
LED Light Specifications:
Actual Wattage vs. Equivalent:
- Look for actual power consumption, not “equivalent”
- 30-50 watts actual power per square foot of growing space
- Ignore “1000W equivalent” marketing claims
Light Spectrum:
- Full spectrum: Contains all colors plants need
- White light: Good for most applications
- Red/Blue combinations: Can work but less versatile
Budget LED Options ($25-75):
- 30-100 watts actual power
- Good for 2-4 square feet
- Basic timing controls
- Examples: Spider Farmer SF-1000, VIPARSPECTRA
Quality LED Options ($75-200):
- 100-300 watts actual power
- Advanced spectrum control
- Better heat management
- Examples: Mars Hydro, Spider Farmer, HLG
Alternative Lighting Options
Fluorescent Lights:
- Pros: Inexpensive, low heat, good for seedlings
- Cons: Lower intensity, shorter lifespan
- Best for: Seed starting, herbs, supplemental lighting
- Cost: $15-50
CFL Bulbs:
- Pros: Very inexpensive, can use regular fixtures
- Cons: Lower efficiency, need multiple bulbs
- Best for: Very small setups, experimentation
- Cost: $10-30
Light Timing and Control
Photoperiod Requirements:
- Leafy greens: 12-16 hours per day
- Herbs: 14-16 hours per day
- Fruiting plants: 16-18 hours per day
Timer Options:
- Mechanical timers: $5-15, simple on/off
- Digital timers: $15-30, multiple programs
- Smart timers: $25-50, app control and monitoring
Light Positioning
Height Guidelines:
- LED lights: 12-24 inches above plants
- Fluorescent: 6-12 inches above plants
- Adjust based on plant response (stretching = too far, burning = too close)
Coverage Patterns:
- Most lights have optimal coverage area specifications
- Overlap coverage areas for even lighting
- Consider light intensity drops toward edges
Nutrients and Supplements
Commercial Nutrient Solutions
Three-Part Nutrients:
- Description: Separate bottles for grow, micro, and bloom
- Pros: Precise control, can adjust ratios
- Cons: More complex mixing
- Best for: Advanced beginners, fruiting plants
- Examples: General Hydroponics Flora Series, Advanced Nutrients
- Cost: $25-50 for complete set
All-in-One Nutrients:
- Description: Everything mixed in one bottle
- Pros: Simple mixing, hard to make mistakes
- Cons: Less control over individual elements
- Best for: True beginners, leafy greens
- Examples: MasterBlend, Maxigrow
- Cost: $15-30
Dry vs. Liquid Nutrients:
Liquid Nutrients:
- Pros: Easy to measure and mix
- Cons: More expensive per use, heavy to ship
- Best for: Small-scale growing, beginners
Dry Nutrients:
- Pros: Much more economical, longer shelf life
- Cons: Require more careful measuring
- Best for: Larger systems, cost-conscious growers
pH Adjusters
pH Down (Acid):
- Common types: Phosphoric acid, nitric acid
- Use: Lower pH when above 6.5
- Safety: Handle carefully, add to water slowly
- Cost: $8-15 per bottle
pH Up (Base):
- Common types: Potassium hydroxide, potassium carbonate
- Use: Raise pH when below 5.5
- Safety: Caustic, handle with care
- Cost: $8-15 per bottle
Measuring and Mixing Tools
Essential Mixing Tools:
- Measuring syringes (1ml, 5ml, 10ml): $5-10
- Measuring cups with pour spouts: $5-10
- Stirring sticks or spoons: $3-5
- Small funnels for precise pouring: $3-5
Mixing Containers:
- Separate containers for mixing nutrients
- Graduated markings helpful
- Easy-pour spouts preferred
Pumps and Circulation (System-Dependent)
When You Need Water Pumps
Systems Requiring Pumps:
- NFT (Nutrient Film Technique)
- Ebb and Flow (Flood and Drain)
- Drip systems
- Recirculating DWC
Systems Not Requiring Pumps:
- Static DWC (Deep Water Culture)
- Wick systems
- Kratky method
Submersible vs. Inline Pumps
Submersible Pumps:
- Description: Pump sits inside nutrient reservoir
- Pros: Self-priming, quiet, compact
- Cons: Can heat up nutrient solution
- Best for: Small to medium systems
- Cost: $15-50
Inline Pumps:
- Description: Pump sits outside reservoir
- Pros: Don’t heat nutrient solution, more powerful
- Cons: More complex installation, priming required
- Best for: Large systems, professional setups
- Cost: $30-150
Pump Sizing
Flow Rate Calculation:
- NFT systems: 1-2 gallons per hour per plant
- Ebb and Flow: Fill tray in 5-10 minutes
- Drip systems: 1-4 gallons per hour total
Head Height Considerations:
- Pumps lose pressure as they pump higher
- Check pump specifications for head height
- Add 20% capacity for system resistance
Timers for Pumps
Mechanical Timers:
- 15-minute minimum intervals
- Good for ebb and flow systems
- Cost: $10-20
Digital Timers:
- 1-minute intervals possible
- Multiple programs per day
- Better for drip systems
- Cost: $20-40
Budget Planning: Equipment by Price Range
Ultra-Budget Setup ($50-100)
Container: Storage tote ($15) Growing medium: Perlite/vermiculite ($15) Net pots: Plastic cups with holes ($5) Testing: pH drops and TDS strips ($10) Nutrients: Basic all-in-one ($15) Aeration: Small air pump and stone ($15) Lighting: Sunny window (free) or CFL bulbs ($15)
Total: $80-95 Good for: Herbs, lettuce, experimentation
Beginner Setup ($150-300)
Container: Food-grade reservoir ($25) Growing medium: Clay pebbles ($20) Net pots: Proper net pots in multiple sizes ($15) Testing: Budget digital pH and EC meters ($40) Nutrients: Quality liquid nutrients ($30) Aeration: Proper air pump, stones, and tubing ($25) Lighting: Basic LED grow light ($50) Accessories: pH adjusters, measuring tools ($15)
Total: $220 Good for: Serious beginners, multiple plants
Quality Setup ($300-600)
Container: Commercial reservoir or custom build ($75) Growing medium: Premium media selection ($35) Net pots: Various sizes and backup supplies ($25) Testing: Quality digital meters with calibration solutions ($100) Nutrients: Professional nutrient system ($50) Aeration: Multi-outlet pump with quality stones ($50) Lighting: High-quality LED with timer ($150) Accessories: Complete tool kit, backup supplies ($40)
Total: $525 Good for: Dedicated growers, larger systems
Professional Setup ($600+)
Container: Multiple professional reservoirs ($150) Growing medium: Large quantities of premium media ($60) Testing: Professional meters with all accessories ($200) Nutrients: Complete nutrient line with supplements ($100) Aeration: Commercial-grade pumps and distribution ($100) Lighting: Multiple high-end LED fixtures ($300) Automation: Timers, controllers, monitoring systems ($150) Backup equipment: Redundant systems and supplies ($100)
Total: $1,160+ Good for: Commercial growing, serious hobbyists
Shopping Strategy and Money-Saving Tips
Where to Buy Equipment
Local Hydroponic Stores:
- Pros: Expert advice, immediate availability, hands-on examination
- Cons: Limited selection, higher prices
- Best for: First-time buyers, complex questions
Online Retailers:
- Pros: Better prices, huge selection, customer reviews
- Cons: No hands-on examination, shipping delays
- Best for: Price-conscious buyers, specific items
Hardware Stores:
- Pros: Basic items at low cost, convenient
- Cons: Limited hydroponic-specific items
- Best for: DIY components, basic supplies
Aquarium Stores:
- Pros: Air pumps, stones, pH tests often cheaper
- Cons: Limited selection
- Best for: Aeration equipment, some testing supplies
Money-Saving Strategies
Start Small and Expand:
- Buy minimum equipment first
- Add upgrades based on experience
- Avoid over-buying initially
Buy Quality Where It Matters:
- Invest in good testing equipment
- Cheap pumps and lights are often false economy
- Growing medium and containers can be budget items
Look for Complete Kits:
- Often better value than individual items
- Ensure components work together
- Read reviews for kit quality
Consider Used Equipment:
- LED lights hold value well
- Pumps and meters may need replacement parts
- Always test used equipment before depending on it
Red Flags: Equipment to Avoid
Extremely Cheap Digital Meters:
- Often inaccurate or unreliable
- Poor calibration capabilities
- May fail quickly
No-Name Nutrients:
- Unknown ingredient quality
- Inconsistent results
- May harm plants
Undersized Air Pumps:
- Insufficient oxygenation leads to root rot
- Better to oversize than undersize
- Check actual wattage, not marketing claims
Clear Reservoirs:
- Will develop algae problems
- Must be covered completely
- Opaque containers are worth the extra cost
Maintenance and Replacement Planning
Equipment Lifespan Expectations
pH and EC Meters:
- Lifespan: 2-5 years with proper care
- Maintenance: Regular calibration, proper storage
- Replacement signs: Won’t calibrate, erratic readings
Air Pumps:
- Lifespan: 2-3 years of continuous use
- Maintenance: Keep dry, replace diaphragms
- Replacement signs: Reduced output, excessive noise
LED Lights:
- Lifespan: 5-10 years
- Maintenance: Keep clean, ensure proper ventilation
- Replacement signs: Reduced brightness, color shift
Air Stones:
- Lifespan: 6-12 months
- Maintenance: Regular cleaning, replace when clogged
- Replacement signs: Reduced bubble production
Maintenance Schedule
Weekly:
- Clean and calibrate meters
- Check air pump operation
- Inspect all tubing and connections
Monthly:
- Deep clean air stones
- Check all electrical connections
- Test backup equipment
Seasonally:
- Replace air stones
- Calibrate all meters thoroughly
- Update equipment inventory
Building a Spare Parts Kit
Essential Spares:
- Extra air stones ($10)
- Backup airline tubing ($5)
- Calibration solutions ($15)
- Spare net pots ($10)
- Extra growing medium ($15)
Nice-to-Have Spares:
- Backup air pump ($20)
- Spare pH/EC meter ($40)
- Extra nutrients ($25)
- Replacement parts for specific equipment
Upgrading Your Equipment Over Time
Natural Upgrade Path
Months 1-3: Master the Basics
- Learn to use existing equipment properly
- Identify what works well and what doesn’t
- Keep detailed notes on equipment performance
Months 4-6: Strategic Improvements
- Upgrade testing equipment first (accuracy matters most)
- Add better lighting if growing indoors
- Improve aeration if needed
Months 7-12: System Expansion
- Add more growing capacity
- Automate routine tasks
- Invest in backup equipment
Year 2+: Specialization
- Focus on specific crops or techniques
- Add advanced monitoring
- Consider commercial-grade equipment
Signs It’s Time to Upgrade
Testing Equipment:
- Inconsistent readings between calibrations
- Difficulty maintaining calibration
- Readings don’t match plant health observations
Lighting:
- Plants stretching toward lights
- Slow growth compared to expectations
- High electricity bills from inefficient lights
Aeration:
- Plants showing signs of poor root health
- Pump struggling to maintain adequate bubbles
- Frequent air stone clogging
General Equipment:
- Frequent equipment failures
- Spending more time on maintenance than growing
- Equipment limiting your growing ambitions
Creating Your Equipment Shopping List
Priority-Based Shopping
Immediate Needs (Buy First):
- Container and lid
- Growing medium and net pots
- Basic pH testing method
- Starter nutrients
- Air pump and stone (if needed)
Short-Term Additions (Within First Month):
- Digital pH meter
- EC/TDS meter
- Proper grow light (if indoors)
- pH adjustment solutions
- Timer for lights
Medium-Term Upgrades (2-6 Months):
- Better testing equipment
- Higher quality lights
- Automation equipment
- Backup supplies
- System expansion components
Long-Term Investments (6+ Months):
- Professional-grade equipment
- Multiple system setups
- Environmental controls
- Advanced monitoring
- Commercial-scale components
Customizing for Your Situation
Apartment Dwellers:
- Prioritize compact, quiet equipment
- Focus on efficient lighting
- Emphasize odor control
Budget-Conscious Growers:
- Start with absolute minimum
- Buy quality items used when possible
- Upgrade gradually based on results
Tech Enthusiasts:
- Invest in digital monitoring early
- Add automation features
- Focus on data collection and analysis
Commercial Aspirations:
- Plan for scalability from the beginning
- Invest in professional-grade equipment
- Focus on efficiency and automation
Conclusion: Building Your Hydroponic Arsenal
Remember, the best hydroponic equipment is the equipment you’ll actually use consistently. Start with quality basics, learn how each component works, and upgrade thoughtfully based on your experience and goals.
Key takeaways for equipment success:
- Start simple – master the basics before adding complexity
- Invest in testing equipment – accurate pH and EC measurement is crucial
- Buy quality lights – if growing indoors, this makes the biggest difference
- Plan for expansion – choose equipment that can grow with your needs
- Maintain everything – proper care extends equipment life significantly
Your next steps:
- Choose your budget range from our planning guide
- Start with the essential equipment for your chosen system
- Focus on learning to use each piece of equipment properly
- Upgrade strategically based on your actual growing experience
This guide is part of our Hydroponics Basics series. Have questions about specific equipment or need help choosing between options? Contact us for personalized equipment recommendations!
Keywords: hydroponic equipment, hydroponic supplies, pH meter, EC meter, grow lights, air pump, hydroponic nutrients, growing medium, net pots