If you’ve read any hydroponic guide, you’ve probably encountered two mysterious abbreviations that seem to terrify beginners: pH and EC. Don’t worry – you’re not alone if these terms make you feel like you need a chemistry degree to grow lettuce!
The truth is, pH and EC are simply measurements that help you understand what’s happening in your nutrient solution. Think of them as the “vital signs” of your hydroponic system – just like checking temperature when you’re sick, monitoring pH and EC helps you keep your plants healthy.
In this complete guide, we’ll demystify these concepts and show you exactly how to measure, understand, and manage pH and EC like a pro. By the end, you’ll feel confident handling these essential aspects of hydroponic growing, and you’ll understand why they’re actually your best friends for growing amazing plants.
What Are pH and EC? Simple Definitions
Before we dive into the technical details, let’s start with simple, practical definitions:
pH (Potential of Hydrogen): A number that tells you how acidic or basic (alkaline) your nutrient solution is. It ranges from 0 to 14, with 7 being neutral.
EC (Electrical Conductivity): A measurement that tells you how much “stuff” (nutrients) is dissolved in your water. Higher EC means more dissolved nutrients.
Think of it this way: pH is like checking if your soup has the right flavor balance (not too sour, not too bitter), while EC is like checking if your soup has enough ingredients in it (not too watery, not too thick).
Understanding pH in Hydroponics
The pH Scale Explained
The pH scale runs from 0 to 14:
- 0-6.9: Acidic (like lemon juice or coffee)
- 7.0: Neutral (pure water)
- 7.1-14: Basic/Alkaline (like baking soda or soap)
For most hydroponic plants, the sweet spot is pH 5.5-6.5 – slightly acidic.
Why pH Matters So Much
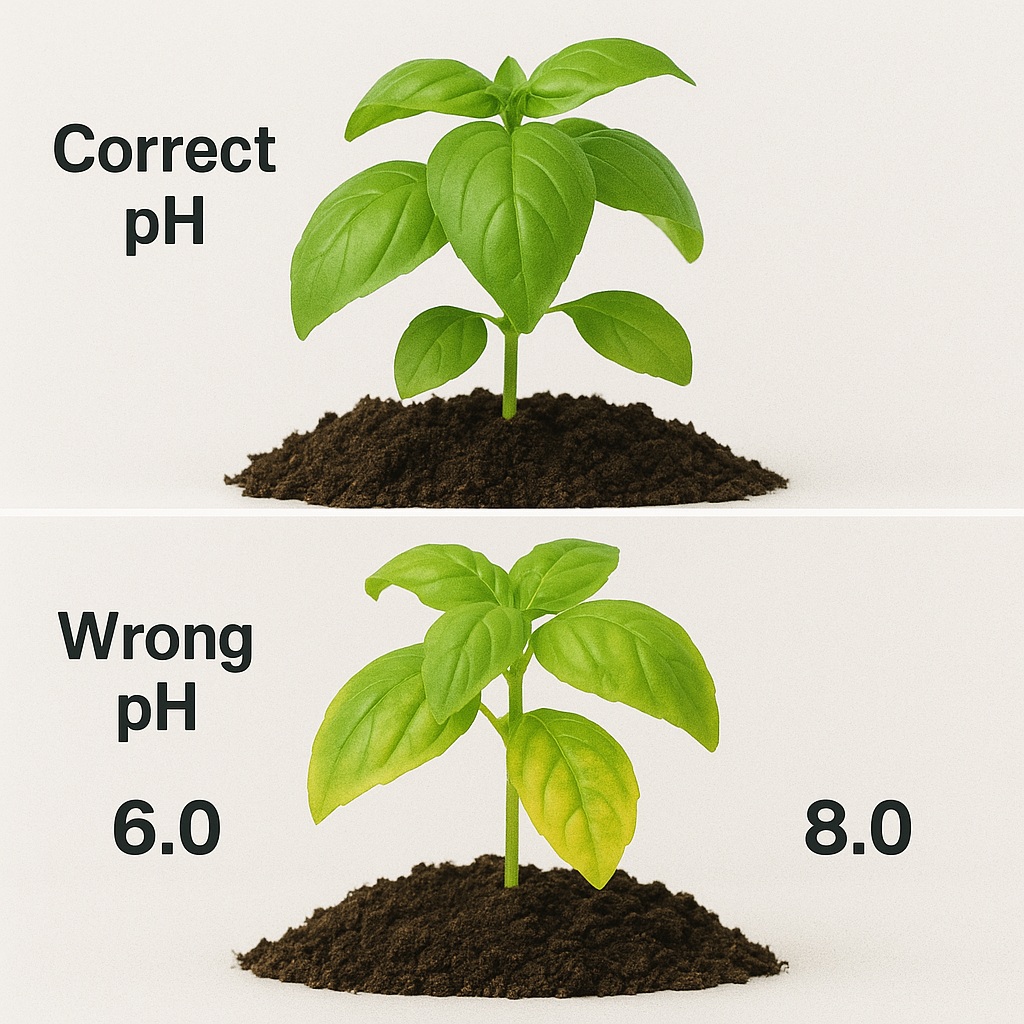
Here’s the crucial part that many beginners don’t understand: plants can only absorb nutrients when the pH is in the right range. It’s not enough to have nutrients in your water – if the pH is wrong, your plants literally can’t “eat” them.
This phenomenon is called nutrient lockout, and it’s like having a full refrigerator but a broken can opener – the food is there, but you can’t access it.
Nutrient Availability by pH Range
Different nutrients become available at different pH levels:
pH 5.0-5.5:
- Iron readily available
- Manganese and zinc available
- Phosphorus less available
pH 5.5-6.0: (Optimal for most plants)
- Best overall nutrient availability
- All major nutrients accessible
- Most hydroponic plants thrive here
pH 6.0-6.5:
- Good for calcium and magnesium uptake
- Still excellent for most nutrients
- Safe range for beginners
pH 6.5-7.0:
- Calcium and magnesium very available
- Iron starts becoming less available
- Some plants (like spinach) prefer this range
pH above 7.0:
- Iron deficiency likely
- Phosphorus becomes less available
- Most hydroponic plants struggle
Common pH Problems and Symptoms
pH Too Low (Under 5.0):
- Symptoms: Burning or yellowing leaf edges, stunted growth
- Cause: Nutrient toxicity from over-availability
- Plants affected: All plants, but especially sensitive ones
pH Too High (Over 7.0):
- Symptoms: Yellowing between leaf veins (chlorosis), poor growth
- Cause: Iron and other micronutrient deficiencies
- Plants affected: Most hydroponic crops

Understanding EC (Electrical Conductivity)
What EC Actually Measures
EC measures how well your nutrient solution conducts electricity. Pure water doesn’t conduct electricity at all, but when you dissolve salts (nutrients) in water, it becomes conductive.
More dissolved nutrients = Higher electrical conductivity = Higher EC reading
EC vs TDS: What’s the Difference?
You might also see TDS (Total Dissolved Solids) mentioned. Here’s the simple explanation:
- EC: Measured in mS/cm (millisiemens per centimeter) or μS/cm (microsiemens)
- TDS: Measured in ppm (parts per million) or mg/L
- Relationship: TDS ≈ EC × 500 (approximately)
Example: EC of 1.4 mS/cm = approximately 700 ppm TDS
Most growers prefer EC because it’s more accurate and doesn’t depend on conversion factors.
Optimal EC Ranges by Plant Type
Seedlings and Young Plants:
- EC: 0.8-1.2 mS/cm
- TDS: 400-600 ppm
- Why lower: Young plants can’t handle strong nutrients
Leafy Greens (Lettuce, Spinach, Herbs):
- EC: 1.2-1.6 mS/cm
- TDS: 600-800 ppm
- Examples: Basil, cilantro, arugula, kale
Fruiting Plants (Tomatoes, Peppers, Cucumbers):
- EC: 1.8-2.4 mS/cm
- TDS: 900-1200 ppm
- Why higher: Need more nutrients for fruit production
Large Plants and Trees:
- EC: 2.0-2.8 mS/cm
- TDS: 1000-1400 ppm
- Examples: Large tomato plants, fruit trees
What Happens When EC is Wrong?
EC Too Low (Under-fertilized):
- Symptoms: Slow growth, pale green or yellow leaves, small plant size
- Cause: Not enough nutrients for proper growth
- Solution: Add more nutrients gradually
EC Too High (Over-fertilized):
- Symptoms: Burned leaf edges, dark green leaves, stunted growth, wilting
- Cause: Salt buildup and nutrient toxicity
- Solution: Dilute with fresh water or change solution
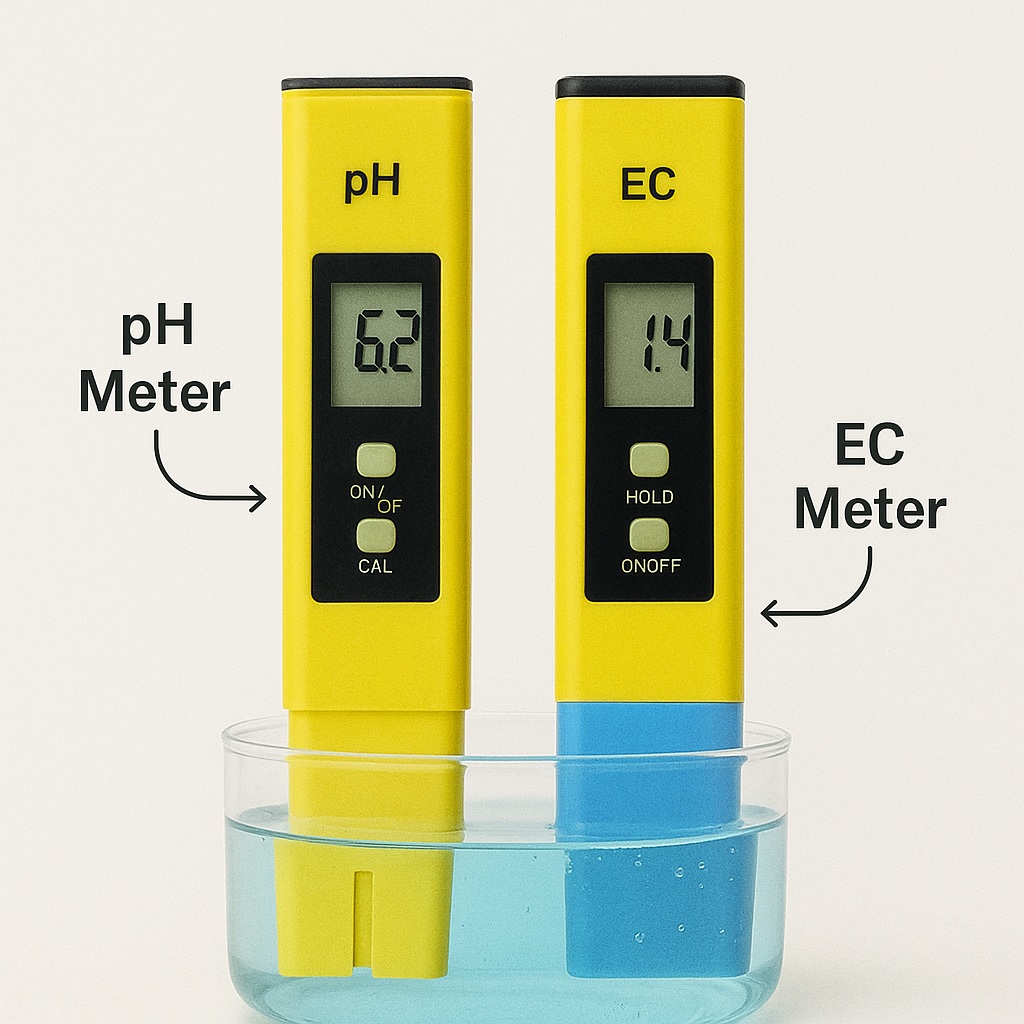
How to Measure pH and EC
Essential Testing Equipment
For pH Testing:
Option 1: Digital pH Meter (Recommended)
- Cost: $25-100
- Accuracy: ±0.1 pH
- Pros: Fast, accurate, easy to read
- Cons: Needs calibration, battery-powered
Option 2: pH Test Drops
- Cost: $5-15
- Accuracy: ±0.2 pH
- Pros: No batteries, inexpensive
- Cons: Color matching can be tricky
Option 3: pH Test Strips
- Cost: $5-10
- Accuracy: ±0.5 pH
- Pros: Very simple, disposable
- Cons: Less accurate, hard to read
For EC Testing:
Digital EC/TDS Meter:
- Cost: $15-75
- Accuracy: ±2% of reading
- Features: Most also measure temperature
- Note: Essential for hydroponic success
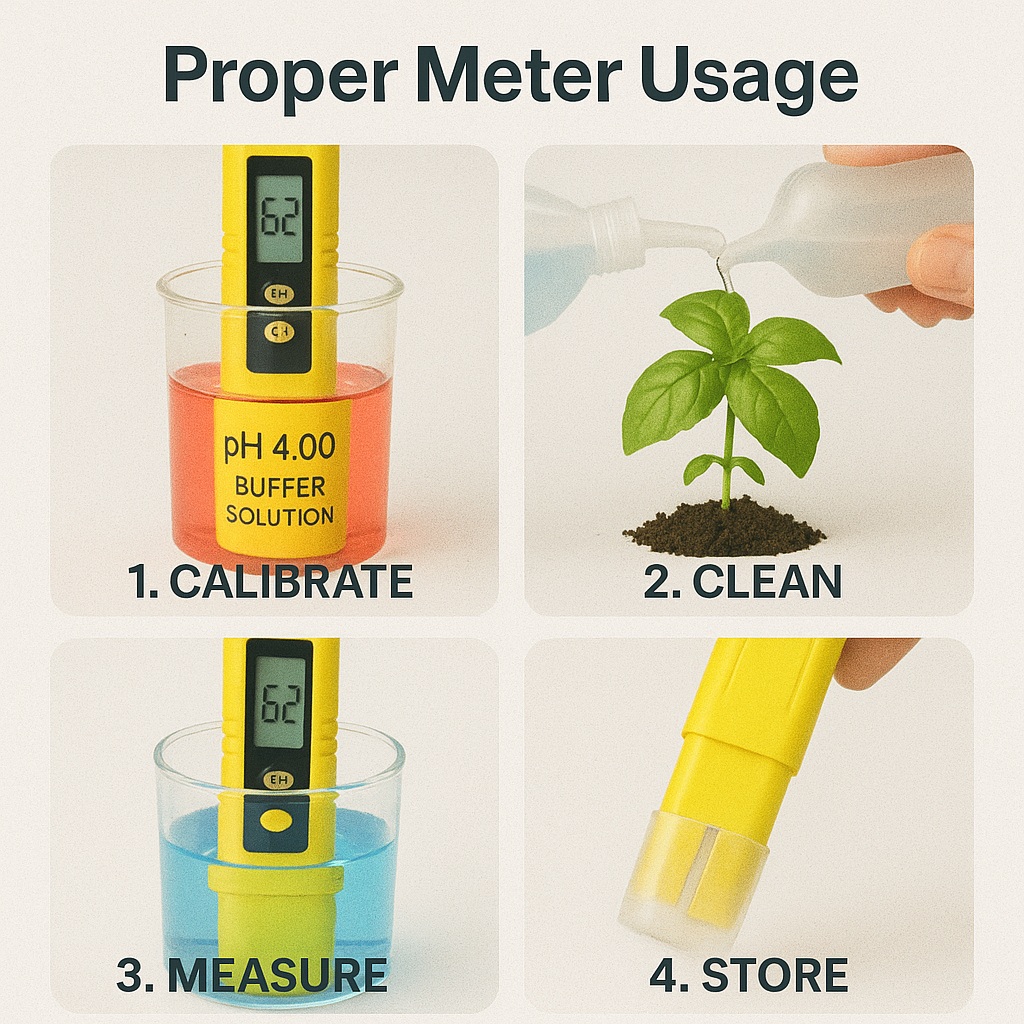
How to Use a Digital pH Meter
Step-by-Step Process:
- Calibrate the meter (weekly or bi-weekly)
- Use pH 4.0 and pH 7.0 calibration solutions
- Follow manufacturer’s instructions exactly
- Clean the probe
- Rinse with distilled water
- Gently wipe with soft cloth
- Take the measurement
- Dip probe into nutrient solution
- Wait for reading to stabilize (30-60 seconds)
- Record the measurement
- Clean after use
- Rinse probe with distilled water
- Store according to instructions (usually in storage solution)
How to Use an EC Meter
Step-by-Step Process:
- Turn on the meter
- Most have automatic temperature compensation
- Rinse the probe
- Use distilled water
- Dip into solution
- Submerge probe completely
- Gently stir to eliminate air bubbles
- Read the measurement
- Wait for stable reading
- Note both EC and temperature
- Clean and store
- Rinse with distilled water
- Store dry (unlike pH meters)
When and How Often to Test
Testing Schedule for Beginners
Daily Checks (First Month):
- Quick visual inspection of plants
- Check water levels in reservoirs
- Test pH if plants show stress
Weekly Testing (Ongoing):
- Full pH and EC measurement
- Record readings in a log
- Make adjustments as needed
Before Each Nutrient Change:
- Test both pH and EC
- Document what worked well
- Plan adjustments for next batch
Best Times to Test
Morning Testing (Recommended):
- More consistent readings
- Plants haven’t been actively feeding all day
- Easier to plan daily adjustments
Avoid Testing:
- Right after adding nutrients (wait 30 minutes)
- During very hot weather (readings can fluctuate)
- Immediately after pH adjustments (wait for stabilization)
Creating a Testing Log
Track These Variables:
- Date and time
- pH reading
- EC reading
- Water temperature
- Plant growth observations
- Any adjustments made
- Problems noticed
Sample Log Entry:
Date: Jan 15, 2025
Time: 8:00 AM
pH: 6.1
EC: 1.3 mS/cm
Temp: 68°F
Plants: Lettuce looking great, basil slightly yellow
Action: Added 2ml pH Down
Notes: Will recheck this evening
How to Adjust pH
pH Adjustment Products
To Lower pH (Make More Acidic):
- pH Down (phosphoric acid or nitric acid)
- White vinegar (for organic systems)
- Citric acid (gentler option)
To Raise pH (Make More Basic):
- pH Up (potassium hydroxide)
- Baking soda (temporary fix only)
- Potassium carbonate (preferred option)
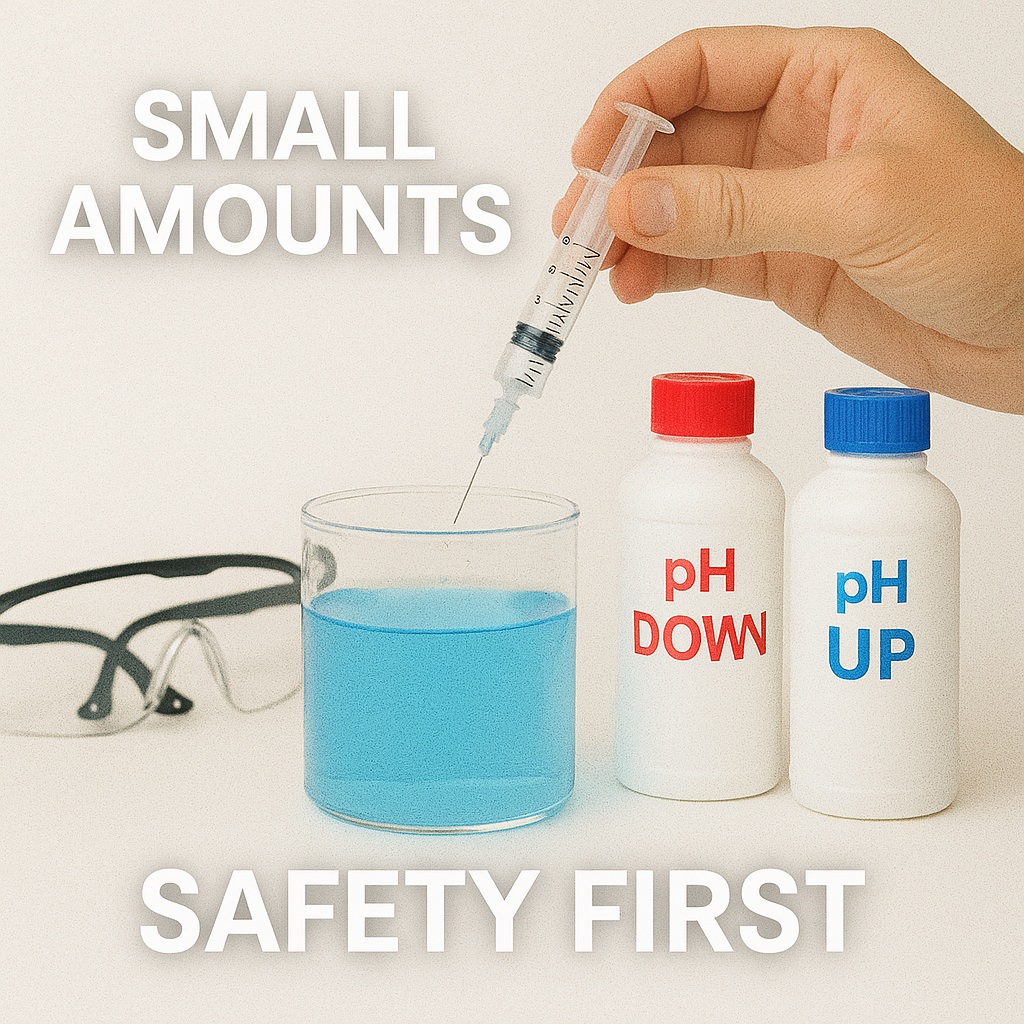
Step-by-Step pH Adjustment
If pH is Too High (Above 6.5):
- Calculate solution volume
- Know how many gallons/liters you’re treating
- Start with small amounts
- Add 1ml of pH Down per 5 gallons
- For smaller systems, use a syringe for precision
- Mix thoroughly
- Stir or run pumps for 15-30 minutes
- Allow solution to circulate
- Retest
- Wait at least 30 minutes after mixing
- Test again and record new reading
- Repeat if necessary
- Make small adjustments
- Never add large amounts at once
If pH is Too Low (Below 5.5):
Follow the same process using pH Up instead of pH Down.
pH Adjustment Safety Tips
Important Safety Rules:
- Always add acid to water, never water to acid
- Wear safety glasses when handling concentrates
- Keep pH adjusters away from children
- Use precise measuring tools (syringes work great)
- Make small adjustments and wait
Common Mistakes to Avoid:
- Adding too much adjuster at once
- Not waiting for the solution to stabilize
- Testing immediately after adjustment
- Using household products not designed for plants
How to Adjust EC
When to Adjust EC
EC Too Low:
- Add more concentrated nutrient solution
- Mix fresh nutrients at higher concentration
- Gradually increase over several days
EC Too High:
- Add plain water to dilute
- Partially change the nutrient solution
- Reduce nutrient concentration in next batch
Step-by-Step EC Adjustment
To Increase EC:
- Mix concentrated nutrients
- Prepare small amount of strong nutrient solution
- Use 2-3x normal concentration
- Add gradually
- Add small amounts to main reservoir
- Mix thoroughly between additions
- Monitor changes
- Test EC after each addition
- Aim for 0.1-0.2 increases at a time
- Check pH
- Adding nutrients often changes pH
- Adjust pH after reaching target EC
To Decrease EC:
- Calculate dilution needed
- Determine how much to reduce EC
- Plan water addition accordingly
- Add plain water
- Use same quality water as usual (RO, filtered, etc.)
- Add gradually while monitoring
- Mix and test
- Ensure complete mixing
- Retest both EC and pH
- Adjust pH if needed
- Dilution often raises pH
- Bring pH back to optimal range
Managing pH and EC Together
The pH-EC Relationship
Important Interactions:
- Adding nutrients usually lowers pH
- Diluting solution usually raises pH
- Plants’ nutrient uptake affects both pH and EC
- Water temperature affects both readings
Weekly Maintenance Routine
Step 1: Test Current Levels
- Measure both pH and EC
- Record readings and observations
Step 2: Adjust EC First
- Bring EC to target range
- Allow 30 minutes for stabilization
Step 3: Adjust pH Second
- Fine-tune pH after EC is correct
- Make small adjustments
Step 4: Final Check
- Retest both parameters
- Document final readings
Step 5: Monitor Plants
- Observe plant response over next few days
- Note any positive or negative changes
Troubleshooting Common pH and EC Problems
Problem: pH Keeps Drifting
Possible Causes:
- Poor quality nutrients
- Bacterial growth in reservoir
- Plant uptake patterns
- Temperature fluctuations
Solutions:
- Use high-quality, pH-buffered nutrients
- Clean and sterilize system regularly
- Maintain stable water temperature
- Consider pH buffering agents
Problem: EC Keeps Rising
Possible Causes:
- Water evaporation (concentrates nutrients)
- Plants taking water but leaving nutrients
- Overfeeding
Solutions:
- Top off with plain water daily
- Reduce nutrient concentration
- Increase water circulation
- Change solution more frequently
Problem: EC Keeps Dropping
Possible Causes:
- Plants consuming nutrients faster than expected
- Large, fast-growing plants
- Underfeeding
- System leaks
Solutions:
- Increase nutrient concentration
- Feed more frequently
- Check for system leaks
- Consider plant growth stage needs
Problem: Measurements Don’t Match Plant Health
Possible Causes:
- Meter calibration issues
- Temperature effects
- Other environmental factors
- Nutrient quality problems
Solutions:
- Recalibrate meters regularly
- Check water temperature
- Examine light, humidity, temperature
- Test with known good nutrients
Advanced Tips for pH and EC Management
Using Buffered Nutrients
What Are Buffered Nutrients:
- Nutrients with pH stabilizers added
- Help maintain stable pH longer
- More expensive but easier for beginners
Benefits:
- Less frequent pH adjustments needed
- More stable growing conditions
- Fewer dramatic pH swings
Temperature Compensation
Why Temperature Matters:
- Both pH and EC readings change with temperature
- Most meters have automatic temperature compensation
- Always note water temperature when testing
Standard Reference:
- Most meters calibrated for 25°C (77°F)
- Significant variations can affect accuracy
- Keep nutrient solution temperature stable
Creating Your Own Reference Standards
Make Calibration Solutions Last:
- Store calibration solutions properly
- Replace when expired or contaminated
- Keep separate solutions for different meter brands
Document Your System:
- Track what works for your specific setup
- Note seasonal variations
- Build experience with your particular plants
Plant-Specific pH and EC Guidelines
Leafy Greens
Lettuce:
- pH: 5.5-6.0
- EC: 1.2-1.6 mS/cm
- Notes: Prefers slightly lower pH, sensitive to high EC
Spinach:
- pH: 6.0-7.0
- EC: 1.4-1.8 mS/cm
- Notes: Tolerates higher pH than most crops
Kale:
- pH: 5.5-6.5
- EC: 1.4-1.8 mS/cm
- Notes: Hardy, tolerates wider ranges
Herbs
Basil:
- pH: 5.5-6.4
- EC: 1.0-1.6 mS/cm
- Notes: Sensitive to overfeeding, prefers lower EC
Cilantro:
- pH: 5.5-6.5
- EC: 1.2-1.8 mS/cm
- Notes: Cool weather crop, adjust for temperature
Mint:
- pH: 5.5-7.0
- EC: 1.4-1.8 mS/cm
- Notes: Very hardy, tolerates wide ranges
Fruiting Crops
Tomatoes:
- pH: 5.5-6.5
- EC: 1.8-2.4 mS/cm (varies by growth stage)
- Notes: Increase EC during fruiting stage
Peppers:
- pH: 5.5-6.0
- EC: 1.8-2.2 mS/cm
- Notes: Consistent feeding important
Cucumbers:
- pH: 5.5-6.0
- EC: 1.7-2.1 mS/cm
- Notes: High water needs, monitor EC closely
Building Confidence with pH and EC
Start Simple
Week 1-2: Observation Phase
- Test daily but don’t make adjustments
- Learn your system’s natural patterns
- Build comfort with testing equipment
Week 3-4: Small Adjustments
- Make minor pH corrections only
- Document all changes and results
- Focus on one parameter at a time
Month 2-3: Full Management
- Manage both pH and EC confidently
- Develop your own routine and schedule
- Start optimizing for specific crops
Common Beginner Concerns
“My pH keeps changing!” This is completely normal. Plants, temperature, and biological processes all affect pH. The goal is to keep it in range, not to keep it perfectly stable.
“I don’t know if my meter is accurate.” Test with known solutions (like pool/spa test kits) or compare with test strips. If readings are consistently different by the same amount, your meter might need calibration.
“Different plants need different pH/EC.” Start with ranges that work for most plants (pH 5.8-6.2, EC 1.2-1.6). You can fine-tune later as you gain experience.
Creating Your pH and EC Action Plan
Essential Equipment Checklist
Must-Have Items:
- [ ] Digital pH meter
- [ ] Digital EC meter
- [ ] pH calibration solutions (4.0 and 7.0)
- [ ] pH Down and pH Up adjusters
- [ ] Measuring syringes or droppers
- [ ] Distilled water for cleaning
- [ ] Testing log or notebook
Nice-to-Have Items:
- [ ] Temperature meter (often built into EC meters)
- [ ] Backup test strips or drops
- [ ] pH buffer solutions
- [ ] Timer for testing reminders
Your First Month Action Plan
Week 1:
- Set up testing equipment
- Calibrate meters properly
- Begin daily testing routine
- Start keeping records
Week 2:
- Make first small pH adjustments
- Learn your system’s patterns
- Identify optimal testing times
Week 3:
- Begin managing EC levels
- Coordinate pH and EC adjustments
- Develop confidence with equipment
Week 4:
- Establish weekly maintenance routine
- Fine-tune based on plant response
- Plan for ongoing optimization
Conclusion: Mastering Your System’s Vital Signs
Understanding and managing pH and EC isn’t just about following numbers – it’s about creating the optimal environment for your plants to thrive. Think of yourself as a plant doctor, using these measurements to diagnose and treat your hydroponic garden.
Remember these key points:
- pH controls nutrient availability – keep it in the 5.5-6.5 range for most plants
- EC measures nutrient concentration – adjust based on plant type and growth stage
- Test regularly but don’t overcorrect – small, gradual changes work best
- Keep good records – your log becomes your best learning tool
- Stay calm and be patient – both pH and EC naturally fluctuate
The more you work with pH and EC, the more intuitive it becomes. Soon you’ll be able to look at your plants and have a good sense of what your measurements will show. You’ll develop an instinct for when something needs adjustment and when everything is running smoothly.